How to Install and Configure n8n on Your Own VPS
Install n8n on your own VPS with Docker, PostgreSQL and HTTPS — a self-hosted automation server you control end to end, not rented by the workflow.
n8n is a workflow automation tool you connect to other apps and APIs to move data and trigger actions between them, without writing a full integration each time. The fastest way to run your own copy is Docker, and for anything beyond a five-minute test, that means Docker Compose with a real database, a domain, and a certificate in front of it — not the single-container command you’ll find in most quick-start posts.
Set this up on a fresh Ubuntu 24.04 VPS: n8n behind Nginx with a Let’s Encrypt certificate, backed by PostgreSQL, running the current n8n release (2.30.8) with its task runner as a separate process, the way n8n’s own Docker Compose reference now ships it. The output blocks below are exactly what these commands print.
What the examples stand for
| What it is | The value used below | Where yours comes from |
|---|---|---|
| Your domain | n8n.example.com |
Your own domain, with an A record already pointing at the server |
| The user you log in as | ubuntu |
Whatever sudo-capable user you set up on the server |
| Project directory | ~/n8n |
Created in step 1 below |
| Postgres database and user | n8n |
You choose it — used throughout below |
| Postgres password, encryption key, runner token | generated with openssl rand -hex in step 1 |
Generate your own — never reuse the length or the idea of a fixed value |
| Owner account email | [email protected] |
Your own email |
| Certbot notification email | [email protected] |
Your own email — separate from the owner account above, used only for certificate expiry warnings |
Everything above is n8n.example.com throughout — except Certbot’s own output in Step 3, which names the real domain this was verified against, because that’s genuinely what it printed.
Before you start
You need:
- A VPS running Ubuntu 24.04, with a sudo-capable user and a working SSH login. If you don’t have the server yet, Getting Started with Lineserve Cloud: Launch Your First VPS covers ordering one; Initial Ubuntu 24.04 Server Setup: Users, SSH, Firewall covers the user and SSH part if you’re starting from a bare root login.
- A domain name with an A record already pointing at the server’s public IP. You need this before the HTTPS step — Let’s Encrypt proves you control the domain by reaching it over that A record.
- At least 2 GB of RAM and 20 GB of disk. More on sizing near the end.
n8n’s self-hosted edition ships under the Sustainable Use License. Running it for your own business, or for personal/non-commercial use, is free and unrestricted. Reselling it as a hosted service to other people — running n8n instances for clients — needs n8n’s commercial Enterprise licence instead.
Step 1: Install Docker and set up the project
Log in as your sudo user, then install Docker from its official repository:
sudo apt-get update -y
sudo apt-get install -y ca-certificates curl
sudo install -m 0755 -d /etc/apt/keyrings
sudo curl -fsSL https://download.docker.com/linux/ubuntu/gpg -o /etc/apt/keyrings/docker.asc
sudo chmod a+r /etc/apt/keyrings/docker.asc
echo \
  "deb [arch=$(dpkg --print-architecture) signed-by=/etc/apt/keyrings/docker.asc] https://download.docker.com/linux/ubuntu \
  $(. /etc/os-release && echo "$VERSION_CODENAME") stable" | \
  sudo tee /etc/apt/sources.list.d/docker.list > /dev/null
sudo apt-get update -y
sudo apt-get install -y docker-ce docker-ce-cli containerd.io docker-buildx-plugin docker-compose-plugin
Confirm both pieces landed:
sudo docker --version
sudo docker compose version
Both printed:
Docker version 29.6.2, build dfc4efb
Docker Compose version v5.3.1
You’ll also need openssl in a moment, to generate secrets. It ships with Ubuntu 24.04 by default — confirm it’s there before relying on it:
openssl version
It printed:
OpenSSL 3.0.13 30 Jan 2024 (Library: OpenSSL 3.0.13 30 Jan 2024)
If that prints “command not found” instead, install it with sudo apt-get install -y openssl.
Create the project directory and move into it — everything from here happens inside it:
mkdir -p ~/n8n
cd ~/n8n
Generate three secrets: the Postgres password, n8n’s credential-encryption key, and a token the task runner uses to authenticate to the main n8n process. This file is worth backing up — covered in Back up n8n below.
PG_PASS=$(openssl rand -hex 20)
N8N_ENC_KEY=$(openssl rand -hex 32)
RUNNER_TOKEN=$(openssl rand -hex 32)

cat > .env <<EOF
N8N_VERSION=2.30.8
POSTGRES_USER=n8n
POSTGRES_PASSWORD=${PG_PASS}
POSTGRES_DB=n8n
N8N_ENCRYPTION_KEY=${N8N_ENC_KEY}
RUNNERS_AUTH_TOKEN=${RUNNER_TOKEN}
GENERIC_TIMEZONE=Africa/Nairobi
EOF
chmod 600 .env
chmod 600 means only your user can read the file — it holds three secrets in plain text. Swap Africa/Nairobi for your own tz database name (the same format used by timedatectl list-timezones); this controls what time n8n’s Schedule Trigger nodes fire on.
Step 2: Write the Compose file and start n8n
Create docker-compose.yml with three services: Postgres, n8n itself, and n8n’s task runner, which handles Code-node and expression execution as a separate process rather than inside the main container:
cat > docker-compose.yml <<'EOF'
volumes:
  db_storage:
  n8n_storage:

services:
  postgres:
    image: postgres:16
    restart: always
    env_file: .env
    environment:
      - POSTGRES_USER=${POSTGRES_USER}
      - POSTGRES_PASSWORD=${POSTGRES_PASSWORD}
      - POSTGRES_DB=${POSTGRES_DB}
    volumes:
      - db_storage:/var/lib/postgresql/data
    healthcheck:
      test: ['CMD-SHELL', 'pg_isready -h localhost -U ${POSTGRES_USER} -d ${POSTGRES_DB}']
      interval: 5s
      timeout: 5s
      retries: 10

  n8n:
    image: docker.n8n.io/n8nio/n8n:${N8N_VERSION}
    restart: always
    env_file: .env
    environment:
      - DB_TYPE=postgresdb
      - DB_POSTGRESDB_HOST=postgres
      - DB_POSTGRESDB_PORT=5432
      - DB_POSTGRESDB_DATABASE=${POSTGRES_DB}
      - DB_POSTGRESDB_USER=${POSTGRES_USER}
      - DB_POSTGRESDB_PASSWORD=${POSTGRES_PASSWORD}
      - N8N_ENCRYPTION_KEY=${N8N_ENCRYPTION_KEY}
      - N8N_RUNNERS_MODE=external
      - N8N_RUNNERS_AUTH_TOKEN=${RUNNERS_AUTH_TOKEN}
      - N8N_RUNNERS_BROKER_LISTEN_ADDRESS=0.0.0.0
      - GENERIC_TIMEZONE=${GENERIC_TIMEZONE}
      - TZ=${GENERIC_TIMEZONE}
    ports:
      - 127.0.0.1:5678:5678
    volumes:
      - n8n_storage:/home/node/.n8n
    depends_on:
      postgres:
        condition: service_healthy

  n8n-runner:
    image: n8nio/runners:${N8N_VERSION}
    restart: always
    environment:
      - N8N_RUNNERS_AUTH_TOKEN=${RUNNERS_AUTH_TOKEN}
      - N8N_RUNNERS_TASK_BROKER_URI=http://n8n:5679
    depends_on:
      - n8n
EOF
The 127.0.0.1:5678:5678 binding matters: it publishes n8n’s port only to the server itself, not to the internet. Nginx will be the only thing reachable from outside once it’s in place.
Validate the file, pull the images, and bring the stack up:
sudo docker compose config --quiet && echo "OK: compose file is valid"
sudo docker compose pull
sudo docker compose up -d
pull prints a progress line per image layer — normal, and safe to ignore as long as it ends without an error. up -d prints a handful of Container ... Created / Started lines. Neither is the real check; docker compose ps is. Give it a few seconds to run its first-launch database migrations, then check all three containers:
sudo docker compose ps
It printed:
NAME               IMAGE                            COMMAND                  SERVICE      CREATED          STATUS                    PORTS
n8n-n8n-1          docker.n8n.io/n8nio/n8n:2.30.8   "tini -- /docker-ent…"   n8n          58 seconds ago   Up 51 seconds             127.0.0.1:5678->5678/tcp
n8n-n8n-runner-1   n8nio/runners:2.30.8             "tini -- /usr/local/…"   n8n-runner   58 seconds ago   Up 51 seconds             5680/tcp
n8n-postgres-1     postgres:16                      "docker-entrypoint.s…"   postgres     58 seconds ago   Up 57 seconds (healthy)   5432/tcp
All three should read Up, and postgres should say (healthy). If n8n-1 is missing or keeps restarting, read its logs before doing anything else:
sudo docker compose logs n8n --tail 30
A working instance answers locally on its health endpoint:
curl -sS http://localhost:5678/healthz
It answered:
{"status":"ok"}
Step 3: Put it behind your domain with HTTPS
Install Nginx and Certbot, and open only the ports you actually need:
sudo apt-get install -y nginx certbot python3-certbot-nginx ufw
sudo ufw allow OpenSSH
sudo ufw allow 'Nginx Full'
sudo ufw --force enable
It confirms before dropping you back to the prompt:
Firewall is active and enabled on system startup
Check what’s actually open before moving on — this is the one moment you could lock yourself out over SSH, so confirm OpenSSH made the list:
sudo ufw status
OpenSSH is on the list, so the connection you’re using right now stays open:
Status: active

To                         Action      From
--                         ------      ----
OpenSSH                    ALLOW       Anywhere
Nginx Full                 ALLOW       Anywhere
OpenSSH (v6)                ALLOW       Anywhere (v6)
Nginx Full (v6)             ALLOW       Anywhere (v6)
Write the reverse-proxy config, swapping in your own domain wherever you see n8n.example.com:
sudo tee /etc/nginx/sites-available/n8n > /dev/null <<'EOF'
server {
    listen 80;
    server_name n8n.example.com;

    location / {
        proxy_pass http://127.0.0.1:5678;
        proxy_http_version 1.1;
        proxy_set_header Upgrade $http_upgrade;
        proxy_set_header Connection "upgrade";
        proxy_set_header Host $host;
        proxy_set_header X-Forwarded-For $proxy_add_x_forwarded_for;
        proxy_set_header X-Forwarded-Host $host;
        proxy_set_header X-Forwarded-Proto $scheme;
        proxy_read_timeout 300s;
    }
}
EOF

sudo ln -sf /etc/nginx/sites-available/n8n /etc/nginx/sites-enabled/n8n
sudo rm -f /etc/nginx/sites-enabled/default
sudo nginx -t
Check both lines before you go anywhere near a reload — a syntax error here fails the reload silently on the live config instead:
nginx: the configuration file /etc/nginx/nginx.conf syntax is ok
nginx: configuration file /etc/nginx/nginx.conf test is successful
sudo systemctl reload nginx
Now get the certificate:
sudo certbot --nginx -d n8n.example.com --non-interactive --agree-tos -m [email protected] --redirect
--non-interactive together with --agree-tos and -m answers every prompt certbot would otherwise ask up front. Certbot proves you control the domain by requesting it over the A record you set up earlier, so this only works once DNS is actually pointing at the server. It printed:
Successfully received certificate.
Certificate is saved at: /etc/letsencrypt/live/n8n.lab.lineserve.dev/fullchain.pem
Key is saved at:         /etc/letsencrypt/live/n8n.lab.lineserve.dev/privkey.pem
This certificate expires on 2026-10-18.
Deploying certificate
Successfully deployed certificate for n8n.lab.lineserve.dev to /etc/nginx/sites-enabled/n8n
Congratulations! You have successfully enabled HTTPS
Certbot rewrites the config it just edited: the port-80 block becomes a redirect, and a new port-443 block carries the certificate. Confirm both:
curl -sS -o /dev/null -w "HTTP %{http_code}\n" https://n8n.example.com/
curl -sS -o /dev/null -w "HTTP %{http_code}\n" http://n8n.example.com/
Both came back as expected — HTTPS serving, plain HTTP redirecting:
HTTP 200
HTTP 301
n8n still thinks it’s running as plain http://localhost:5678, though, so it will generate wrong links and reject webhooks until you tell it about the proxy in front of it. Add these four deployment variables to .env:
cat >> .env <<EOF
N8N_HOST=n8n.example.com
N8N_PROTOCOL=https
N8N_PORT=5678
WEBHOOK_URL=https://n8n.example.com/
N8N_PROXY_HOPS=1
EOF
N8N_PROXY_HOPS=1 tells n8n to trust the X-Forwarded-* headers from exactly one proxy hop (Nginx) — without it, n8n can’t tell a real client IP or protocol from a spoofed one and some checks behave as if every request is still plain HTTP. WEBHOOK_URL matters because n8n builds webhook URLs from N8N_PROTOCOL + N8N_HOST + N8N_PORT by default, which would advertise http://n8n.example.com:5678/... — wrong on every count once Nginx is in front. Recreate the n8n container to pick the new variables up:
sudo docker compose up -d n8n
Confirm it came back up with the new settings before moving on:
curl -sS https://n8n.example.com/healthz
It answered:
{"status":"ok"}
Then confirm it’s actually reachable only through Nginx — the direct port should now time out from outside:
curl -sS -m 5 -o /dev/null -w "direct 5678: HTTP %{http_code}\n" http://n8n.example.com:5678/ || echo "direct 5678: connection timed out"
Five seconds later:
direct 5678: connection timed out
Step 4: Create your owner account
Visit https://n8n.example.com/ in a browser — over HTTPS, not the bare IP or port 5678. n8n only sends its login cookie over an encrypted connection by default, so this step needs Step 3 done first. A fresh instance goes straight to an owner setup form — this is the only account with full admin rights, and n8n won’t let you skip it:
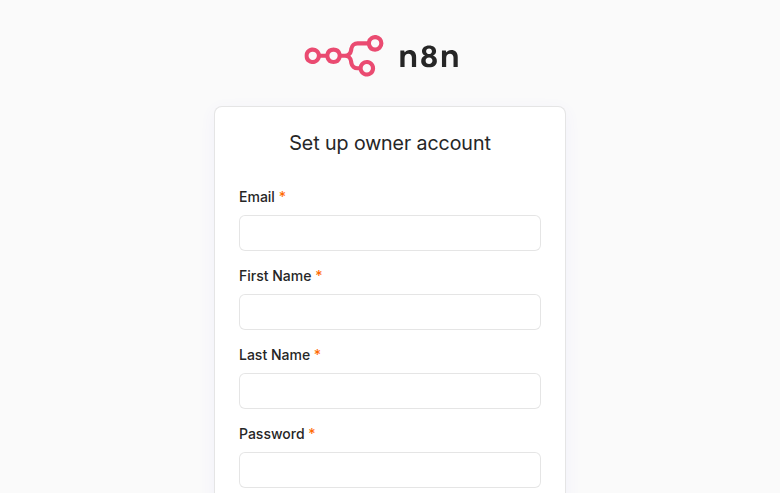
The password rule is enforced on submit: at least 8 characters, one number, one capital letter. After submitting, n8n may show a short “customize n8n to you” survey — it’s asking about your company and use case for its own product analytics, not configuring anything; answer it or click through, either way you land in the empty workflow list once it’s done.
Step 5: Build and run a workflow
Every workflow starts with a trigger — the thing that decides when it runs. Open a new workflow and you’re offered the trigger types directly:
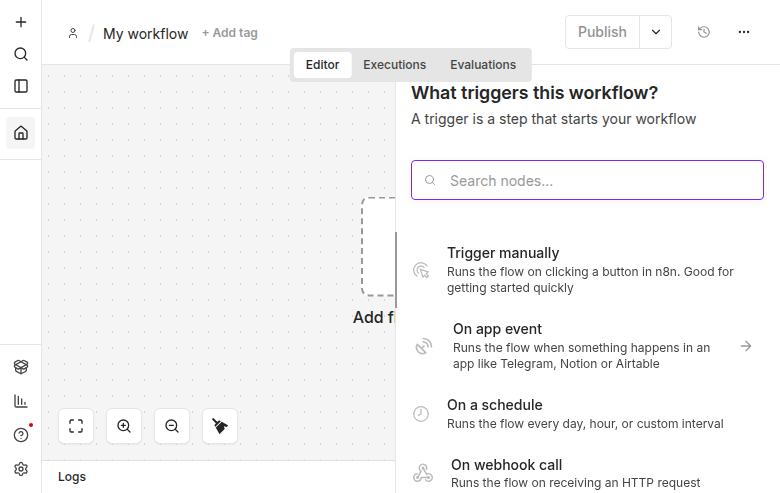
For a first workflow, pick Trigger manually — it runs only when you click a button in the editor, which is the fastest way to prove the install actually works end to end:
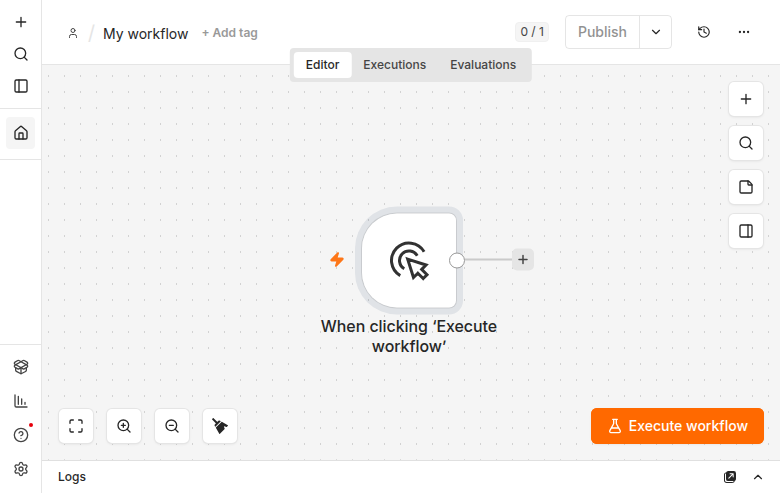
Click the + on the trigger’s output to add a second node, search for Edit Fields, and add one field to prove data flows through the workflow — name it message, type Hello from n8n on Lineserve, or anything else you like:
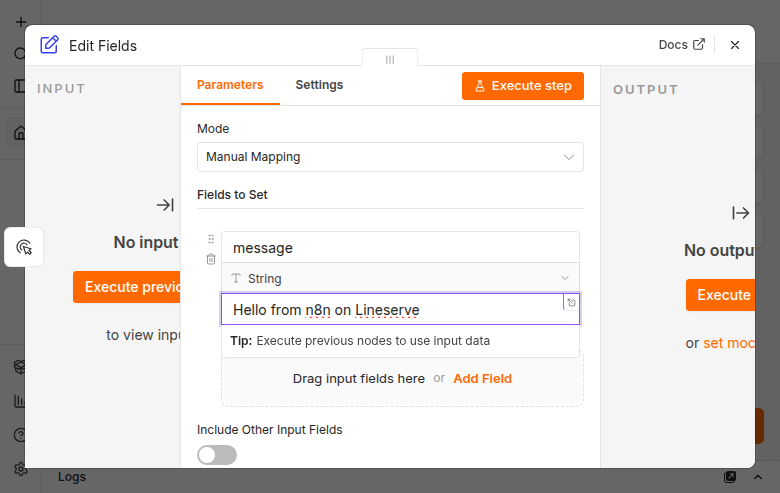
Click Execute workflow at the bottom of the canvas. Both nodes turn green with a checkmark, and a “Workflow executed successfully” toast confirms it ran end to end:
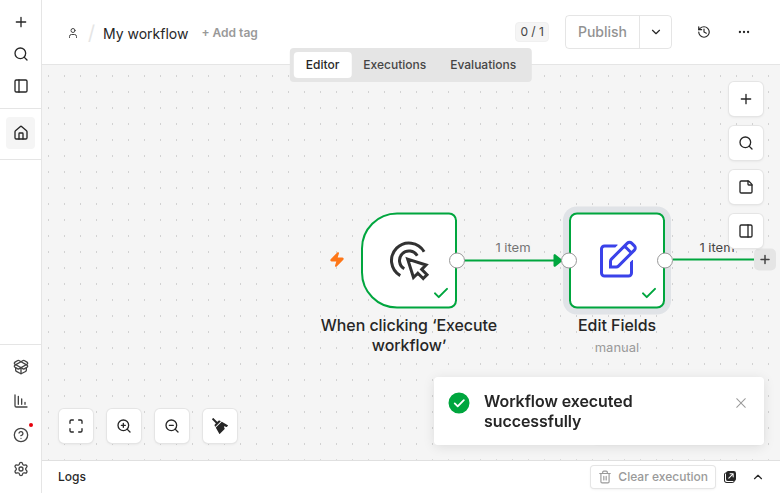
The Edit Fields node above runs inside n8n’s main process. To actually exercise the separate task-runner container from step 2, add one more node: click the + on Edit Fields’ output, search for Code, and add Code in JavaScript. Its default script tags every item with a new field — run it as-is:
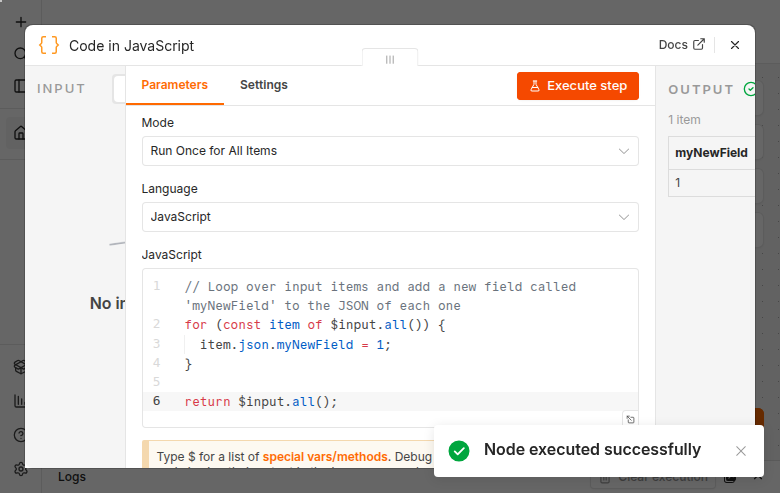
That confirms the runner container is actually reachable, not just running: n8n hands Code-node JavaScript to it over the internal broker connection, and the result comes back the same way — n8n’s own guidance is that this external setup, not a single-process instance, is what production should run. From here, swap the manual trigger for a Schedule trigger to run on a timer, or a Webhook trigger to react to an HTTP request from another service — a common one is triggering a workflow from an M-Pesa or Paystack callback, which Accepting Payments in Africa: M-Pesa, Paystack & Flutterwave covers on the payment side.
Back up n8n
Two things need backing up: the Postgres database (every workflow, credential and execution record) and the n8n_storage volume (the encryption key that makes the credentials in that database readable at all — lose this and the credentials are permanently unrecoverable, not just inconvenient to re-enter).
cd ~/n8n
mkdir -p ~/n8n-backups
sudo docker compose exec -T postgres pg_dump -U n8n -d n8n > ~/n8n-backups/n8n-db-$(date +%F).sql
sudo docker run --rm -v n8n_n8n_storage:/data -v ~/n8n-backups:/backup alpine \
  tar czf /backup/n8n-storage-$(date +%F).tar.gz -C /data .
ls -lh ~/n8n-backups/
Two files landed:
total 316K
-rw-rw-r-- 1 ubuntu ubuntu 310K Jul 20 18:40 n8n-db-2026-07-20.sql
-rw-r--r-- 1 root   root   1.7K Jul 20 18:40 n8n-storage-2026-07-20.tar.gz
Copy both files somewhere off the server — object storage, or even scp to your own machine — on a schedule.
To restore onto a fresh box with the same docker-compose.yml and .env in ~/n8n: bring Postgres up alone, pipe the SQL dump into it, unpack the volume archive, then start everything. Swap 2026-07-20 for the date in your own backup filenames — check with ls ~/n8n-backups/ first:
cd ~/n8n
sudo docker compose up -d postgres
cat ~/n8n-backups/n8n-db-2026-07-20.sql | sudo docker compose exec -T postgres psql -U n8n -d n8n
sudo docker run --rm -v n8n_n8n_storage:/data -v ~/n8n-backups:/backup alpine \
  tar xzf /backup/n8n-storage-2026-07-20.tar.gz -C /data
sudo docker compose up -d
Give it a few seconds, then confirm the same way you did the first install:
curl -sS https://n8n.example.com/healthz
It answered:
{"status":"ok"}
Log in and check the workflow list — the workflow you built earlier should be there, with its original creation date, not a new one.
Update n8n, and confirm it survives a reboot
Check the running version:
cd ~/n8n
sudo docker compose exec n8n n8n --version
It printed:
2.30.8
Then pull and recreate:
sudo docker compose pull
sudo docker compose up -d
docker compose pull only downloads newer images if the tag in .env‘s N8N_VERSION actually points to one — bump that value before pulling if you’re moving to a new release. n8n’s own update guidance is to update at least monthly rather than jumping several versions at once, and to check the release notes for breaking changes first on anything you’re running in production.
restart: always in the Compose file should bring every container back after the server restarts too, without you running docker compose up by hand. Prove it rather than trusting it:
sudo reboot
Your SSH session will drop. Wait about a minute, reconnect, and check:
cd ~/n8n
sudo docker compose ps
sudo ufw status
curl -sS https://n8n.example.com/healthz
All three containers came back up on their own, the firewall rules survived, and the site answered over HTTPS with no manual step in between:
NAME               IMAGE                            COMMAND                  SERVICE      CREATED          STATUS                   PORTS
n8n-n8n-1          docker.n8n.io/n8nio/n8n:2.30.8   "tini -- /docker-ent…"   n8n          7 minutes ago    Up 2 minutes             127.0.0.1:5678->5678/tcp
n8n-n8n-runner-1   n8nio/runners:2.30.8             "tini -- /usr/local/…"   n8n-runner   10 minutes ago   Up 2 minutes             5680/tcp
n8n-postgres-1     postgres:16                      "docker-entrypoint.s…"   postgres     7 minutes ago    Up 2 minutes (healthy)   5432/tcp
Status: active
{"status":"ok"}
Open https://n8n.example.com/ again and check the workflow list. The workflow you built earlier should still be there — Postgres and the n8n_storage volume both live outside the containers, so restarting the containers never touches them.
How much VPS this actually needs
n8n’s own documentation has no dedicated minimum-hardware page. With all three containers idle after a reboot, a 2 vCPU / 2 GB RAM server had 738 MB used and 1.1 GB still available; n8n’s main container held steady around 350 MB, Postgres around 60 MB, and the task runner under 15 MB. The container images pulled down about 3.8 GB combined, and the two data volumes started at 71 MB total and grow with your workflow history — 20 GB of disk leaves comfortable room.
That’s enough for a handful of active workflows with occasional runs. Heavier use — many workflows on tight schedules, large payloads through the Code node, or several people building at once — pushes memory up faster than CPU; watch sudo docker stats under real load and size up on RAM first if it gets tight. If you’re on a 2 GB box already and want headroom without a bigger plan, Swap Space on a VPS: When You Need It and How to Add It covers adding swap. For visibility into whether the server itself is healthy over time — not just n8n — How to Self-Host Uptime Kuma for Free Server Monitoring with Docker runs alongside this setup in its own container.
Everything above runs comfortably on 2 vCPU, 2 GB RAM, 20 GB SSD and one IPv4 address — sized to exactly what it needs, nothing rounded up. Built resource by resource on Lineserve Cloud Servers — 2 vCPU + 2 GB RAM + 20 GB SSD + 1 IPv4 at Lineserve’s published per-resource rates — that comes to $21.28 / KES 2,128 / TZS 42,560 / NGN 21,280 a month. If you’d rather pick from a preset than move sliders, Linux VPS S2 — 1 vCPU, 2 GB RAM, 40 GB SSD — is the closest ready-made match on RAM and price at $21.95 / KES 2,195 / TZS 43,900 / NGN 21,950 a month; CPU sat near-idle throughout this install, so the second vCPU tested above is headroom, not a requirement. Step up to M1 (2 vCPU, 4 GB RAM, 80 GB SSD, $42.40 / KES 4,240 / TZS 84,800 / NGN 42,400) if you’re planning several people building workflows at once or heavier Code-node use. Either way you get a dedicated IPv4 address and billing in your local currency by M-Pesa, bank transfer or card.