How I Built a Full ISP Network in a Lab: BGP Multihoming with MikroTik
I built a working ISP edge in a lab: MikroTik BGP multihoming with two transits, two IXPs, and BGP customers — every command and output is real.
Most “MikroTik BGP multihoming” guides stop at two peer statements and a screenshot of a session coming up. That is not multihoming — that is two BGP sessions. Real multihoming is the policy: which upstream wins, what you announce to whom, what you refuse to accept, and what happens at 3 a.m. when a transit link dies. So I built the whole thing in a lab I can tear down and rebuild in seconds, and ran every failure on purpose.
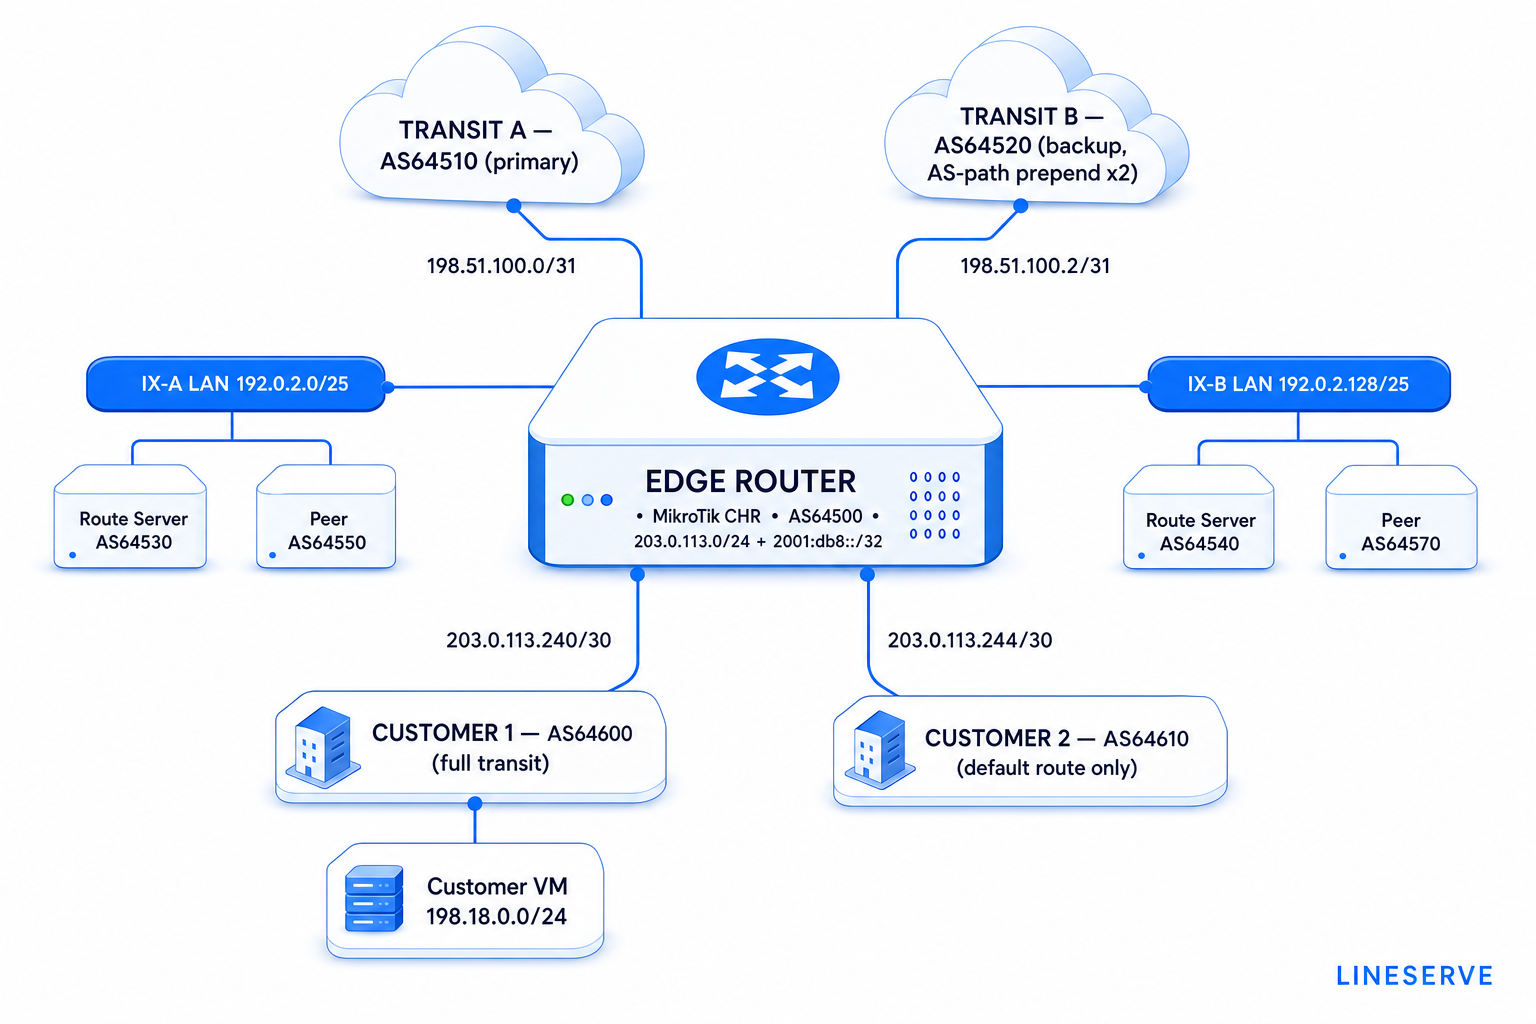
This is that lab: a MikroTik CHR edge router running RouterOS 7.23, dual-homed to two transit providers, peering at two internet exchanges (route servers and a bilateral peer), with two downstream BGP customers hanging off it — full dual-stack, real routing policy, real route leak, real convergence measurements. Everything runs as containers with containerlab, so you can clone the tree and stand up the same network on one Linux box.
Two honesty notes before we start, because this is the difference between a guide you can trust and one you can’t. First: every command block below is something I typed on the running lab, and every output block beneath it is what that box actually printed — captured, not hand-written. When I show you a failure, a real command produced it. Second: this is a simulation built entirely from documentation IP ranges (RFC 5737, 3849, 5398), so nothing here can collide with or leak into the real internet. A few things — real RPKI signed by a RIR, real IRR objects, a real transit contract — genuinely cannot be simulated; I flag every one of those where it comes up and describe the real-world workflow instead of faking it.
This is written for someone who already administers routers and is comfortable in a shell. I will not re-explain cd or ssh. I will spell out exactly where each config goes and what each value means, because RouterOS 7’s BGP is not the RouterOS 6 (or even early v7) BGP you may remember.
Who’s who in this lab (keep this handy)
Everything in the lab has a fixed identity. You never have to invent an address — here is the whole cast, and every command and diagram below uses exactly these values.
| Role | Name | ASN | Key addressing |
|---|---|---|---|
| Our edge router (MikroTik CHR) | edge |
64500 | 203.0.113.0/24, 2001:db8::/32; loopback 203.0.113.1 |
| Transit A (primary upstream) | transit-a |
64510 | PtP 198.51.100.0/31, 2001:db8:ffff:1::/126 |
| Transit B (backup upstream) | transit-b |
64520 | PtP 198.51.100.2/31, 2001:db8:ffff:2::/126 |
| IX-A route server (BIRD) | ixa-rs |
64530 | 192.0.2.1 on LAN 192.0.2.0/25 |
| IX-A member | ixa-peer |
64550 | 192.0.2.20; originates 198.18.200.0/24 |
| IX-B route server (BIRD) | ixb-rs |
64540 | 192.0.2.129 on LAN 192.0.2.128/25 |
| IX-B member (bilateral + RS) | ixb-peer |
64570 | 192.0.2.140; originates 198.18.201.0/24 |
| Customer 1 (full transit) | cust1 |
64600 | PtP 203.0.113.240/30; owns 198.18.0.0/24, 2001:db8:1000::/48 |
| Customer 2 (default only) | cust2 |
64610 | PtP 203.0.113.244/30; owns 198.18.1.0/24 |
| A machine on Customer 1’s LAN | custvm |
— | 198.18.0.10 |
| A destination “on the internet” | internet |
— | 198.51.100.200, behind both transits |
Our edge is AS64500 with a single /24, 203.0.113.0/24, and a matching IPv6 /32. A /24 is deliberate: it is both the smallest globally-routable IPv4 prefix (most operators filter anything longer) and, conveniently, exactly what RFC 5737 hands you as documentation space.
What you need to run it
Only one piece of this lab needs special hardware. The MikroTik CHR is a real RouterOS image running as a small VM (via QEMU) inside its container, so the host needs KVM / nested virtualization — without /dev/kvm, QEMU falls back to slow software emulation. Everything else (the transits, route servers, customers, and hosts) is an ordinary Linux container. I built this on a KVM-capable Linux box with 12 cores and 64 GB of RAM; it barely noticed the load, because only the single CHR is a virtual machine.
Sizing, from what I actually watched it use:
| What you run | RAM | Notes |
|---|---|---|
| This lab as written (3,000-route tables) | 8–16 GB | comfortable; one CHR VM + ten containers |
| Same lab with real full tables (~1M routes) | 32 GB+ | see the “full table” note below |
The KVM requirement is the one thing to plan around: a standard shared VPS usually does not expose nested virtualization, so this is a job for a bare-metal or nested-virt-capable host. Confirm your host actually has it before you build anything, on the lab host’s shell:
ls -l /dev/kvm && egrep -c '(vmx|svm)' /proc/cpuinfo
You want /dev/kvm to exist and the second number to be non-zero (that is your core count with virtualization flags):
crw-rw---- 1 root kvm 10, 232 /dev/kvm
24
If /dev/kvm is missing, stop here and move to a host that has it — the CHR will still boot without it, but slowly enough to waste your afternoon.
You need three tools on that host. Docker is assumed already installed and running (docker run hello-world should succeed); if it isn’t, install it first. containerlab installs with its official one-liner:
bash -c "$(curl -sL https://get.containerlab.dev)"
The third is the CHR image, which you build yourself from MikroTik’s free Cloud Hosted Router download — that is the next section.
Building the CHR image
RouterOS ships CHR as a disk image, and the hellt/vrnetlab project turns it into a container image containerlab can boot. Clone vrnetlab, then from its mikrotik/routeros/ directory fetch the exact RouterOS I pinned this lab to and drop the .vmdk in place — on the lab host:
git clone https://github.com/hellt/vrnetlab
cd vrnetlab/mikrotik/routeros
curl -O https://download.mikrotik.com/routeros/7.23/chr-7.23.vmdk.zip
unzip chr-7.23.vmdk.zip
sha256sum chr-7.23.vmdk.zip
That last line is not optional — pin the hash so you know you built from the same bits I did. On my run it printed:
e6524abc463a754a2846957d42d99401353491dfd46e0f0b6cc5334d7c9b8d21 chr-7.23.vmdk.zip
RouterOS 7.23 was the current stable release when I built this (dated 2026-05-25). RouterOS v7 rewrote BGP from scratch versus v6 — if you arrive here from an older tutorial, its /routing bgp peer commands do not exist anymore, which is exactly why I pinned a version. Now build the image:
make docker-image
When it finishes, you have vrnetlab/mikrotik_routeros:7.23 in your local Docker. Confirm it:
docker images | grep mikrotik_routeros
You are looking for the tag to be present:
vrnetlab/mikrotik_routeros 7.23 f737b1910858 1.3GB
Standing the lab up
The lab tree — the containerlab topology, every node’s config, and the deploy script — ships as one repo you clone; I’m putting it up publicly and the link will land right here the moment it’s live. From inside the tree, one command builds the last image, creates the exchange LAN bridges, deploys, and seeds the transit tables:
./deploy.sh
Under the hood that runs containerlab deploy and then loads a synthetic table into each transit (more on that next). Give the CHR about a minute to boot and apply its config. containerlab assigns the edge a management IP on deploy; find it on the lab host with:
sudo containerlab inspect -t topo.clab.yml | grep edge
On my run the edge came up on 172.30.30.9 (yours will be on containerlab’s management subnet — substitute it below). Now SSH to it with the vrnetlab default login (admin / admin — change it before you do anything real), again from the host:
ssh [email protected]
That drops you at the RouterOS prompt. Every command shown at a /… path from here on is typed on the edge CLI; anything starting with sudo docker exec … is back on the lab host.
Hold off on inspecting BGP state for a few minutes more. deploy.sh just applied a complete, fourteen-session configuration to this router from a single file, and if you look at the resulting state before reading that file, none of it will mean anything — you’d be staring at a finished network wondering where it came from. So the next section reads the configuration the deploy applied, piece by piece, and the session table is the payoff at the end of it.
A note on “full tables”
A real transit hands you the whole internet — around a million IPv4 prefixes. Replaying a genuine RouteViews or RIPE RIS MRT dump is the most authentic way to fill the transits, and if you have 32 GB to spare, that is the move. I deliberately did not do that here: I seed each transit with 3,000 synthetic prefixes carved from 100.64.0.0/10 (RFC 6598 space, so it is unmistakably not real global routing) so the table-size and best-path mechanics are realistic without the memory bill. Everything below about policy, path selection, and convergence works identically at 3,000 or 1,000,000 routes — the numbers are just smaller. deploy.sh generates and loads that fill; the article calls it out wherever the synthetic nature matters.
Reading the edge configuration
The full edge config is one file in the tree, configs/edge/edge.rsc, applied at boot — and it is worth reading in full, because RouterOS 7.23’s BGP model is the thing most people get wrong. Top to bottom the file does five jobs: interface addressing, originating our aggregates, the filter policy, one BGP instance, and fourteen connections. Here is each, in the order the file runs.
Addresses before anything
ether1 is vrnetlab’s management port; the six data links follow in the order the topology wires them, and every BGP neighbour below lives on one of these subnets:
/ip address
add address=198.51.100.0/31 interface=ether2 comment="Transit A PtP"
add address=198.51.100.2/31 interface=ether3 comment="Transit B PtP"
add address=192.0.2.10/25 interface=ether4 comment="IX-A LAN"
add address=192.0.2.138/25 interface=ether5 comment="IX-B LAN"
add address=203.0.113.241/30 interface=ether6 comment="Customer 1 PtP"
add address=203.0.113.245/30 interface=ether7 comment="Customer 2 PtP"
The IPv6 block in the file mirrors this exactly (the /126s and /64s from the cast table), and a loopback bridge interface holds 203.0.113.1 — the router-id you are about to meet.
The instance is mandatory now
In current RouterOS v7, a BGP peer is a connection, but every connection must reference a BGP instance that carries your ASN and router-id. This tripped me up live — a bare /routing/bgp/connection add … fails with missing value(s) of argument(s) instance. So the instance comes first:
/routing bgp instance add name=lineserve as=64500 router-id=203.0.113.1
Older v7 examples that add a connection without an instance simply will not parse on 7.23. That is the single biggest “why won’t this work” trap for anyone coming from a 2022-era guide.
One connection per neighbour per address family
I run separate IPv4 and IPv6 sessions to each neighbour (transport matching the family), which is the common, debuggable choice. Here is Transit A’s pair, and it shows every moving part — the instance, the eBGP role, the inbound and outbound policy chains, and the address-list we originate from:
/routing bgp connection
add name=transit-a-v4 instance=lineserve local.role=ebgp \
    remote.address=198.51.100.1 remote.as=64510 \
    input.filter=TRANSIT-A-IN-V4 output.filter-chain=UPSTREAM-OUT-V4 \
    output.network=ANNOUNCE-V4
add name=transit-a-v6 instance=lineserve local.role=ebgp \
    remote.address=2001:db8:ffff:1::2 remote.as=64510 \
    local.address=2001:db8:ffff:1::1 \
    input.filter=TRANSIT-A-IN-V6 output.filter-chain=UPSTREAM-OUT-V6 \
    output.network=ANNOUNCE-V6
output.network=ANNOUNCE-V4 points at a firewall address-list holding 203.0.113.0/24; that is how we originate our own aggregate. There is a static blackhole route for the aggregate so RouterOS always has something to advertise:
/ip route add dst-address=203.0.113.0/24 blackhole comment="our IPv4 aggregate"
/ip firewall address-list add list=ANNOUNCE-V4 address=203.0.113.0/24
The other twelve connections, by difference
Transit B, the two route servers, the bilateral peer and both customers are the same anatomy with different values, so read them by what changes:
add name=transit-b-v4 instance=lineserve local.role=ebgp \
    remote.address=198.51.100.3 remote.as=64520 \
    input.filter=TRANSIT-B-IN-V4 output.filter-chain=TRANSIT-B-OUT-V4 \
    output.network=ANNOUNCE-V4
add name=ixa-rs-v4 instance=lineserve local.role=ebgp \
    remote.address=192.0.2.1 remote.as=64530 \
    input.filter=IX-IN-V4 output.filter-chain=UPSTREAM-OUT-V4 \
    output.network=ANNOUNCE-V4
add name=cust1-v4 instance=lineserve local.role=ebgp \
    remote.address=203.0.113.242 remote.as=64600 \
    input.filter=CUST1-IN-V4 input.limit-process-routes-ipv4=100 \
    output.network=ANNOUNCE-V4 output.default-originate=always
add name=cust2-v4 instance=lineserve local.role=ebgp \
    remote.address=203.0.113.246 remote.as=64610 \
    input.filter=CUST2-IN-V4 input.limit-process-routes-ipv4=100 \
    output.filter-chain=CUST2-OUT output.default-originate=always
— plus ixb-rs-v4 and ixb-peer-v4, which repeat the IX pattern against AS64540 and AS64570 on the IX-B LAN. Read the differences as decisions. Transit B gets its own outbound chain, TRANSIT-B-OUT-V4 — it prepends, and we will get to why. All the IX sessions share one inbound chain. And the two customer connections carry the two settings an upstream never gets: input.limit-process-routes-ipv4=100, the max-prefix tripwire, and output.default-originate=always, because a customer buying transit from you needs a default route from you. Customer 2’s output.filter-chain=CUST2-OUT then sends only that default — the “default-only customer” product expressed in one line of policy. Each of the seven neighbours has an IPv6 twin of the same shape with local.address pinned to our side of the link, which is how one file ends at fourteen sessions — every line of it in configs/edge/edge.rsc, in exactly this order.
Fourteen sessions: the payoff
Now the state means something. Back on the edge CLI, ask for the sessions:
/routing/bgp/session/print
Fourteen, all E for established — the seven neighbours you just read the configuration for, each in both address families:
Flags: E - ESTABLISHED
 0 E name="ixb-rs-v4-1"
 1 E name="ixa-rs-v4-1"
 2 E name="transit-b-v6-1"
 3 E name="transit-a-v6-1"
 4 E name="ixa-rs-v6-1"
 5 E name="ixb-peer-v6-1"
 6 E name="ixb-rs-v6-1"
 7 E name="cust1-v6-1"
 8 E name="cust2-v6-1"
 9 E name="cust2-v4-1"
10 E name="transit-a-v4-1"
11 E name="ixb-peer-v4-1"
12 E name="cust1-v4-1"
13 E name="transit-b-v4-1"
If you see anything other than fourteen E flags, that is your signal to stop and look — a session in connect or active means the neighbour config or the addressing under it is wrong, and no policy below will behave until every session is up.
The input.filter and output.filter-chain names in those connections point at routing-filter chains — which is where the actual multihoming policy lives.
The policy: this is the actual multihoming
Session state is plumbing. The policy is the network. I’ll build it up in the order it runs on a route.
Best-path and local preference
With both transits handing us the same 3,000 prefixes, every one of those routes arrives twice. Which copy wins? Local preference, and I set it inbound: 100 from Transit A, 90 from Transit B. Higher wins, so Transit A is primary. Take one synthetic prefix, 100.64.0.0/24, and ask the edge how it is reaching it:
/ip/route/print detail where dst-address=100.64.0.0/24
Two paths, and the one via Transit A (198.51.100.1) carries the A (active) flag; Transit B’s copy is there, installed and ready, but not active:
   DAb   dst-address=100.64.0.0/24 gateway=198.51.100.1
         immediate-gw=198.51.100.1%ether2 distance=20
   D b   dst-address=100.64.0.0/24 gateway=198.51.100.3
         immediate-gw=198.51.100.3%ether3 distance=20
That “installed but not active” backup is the whole point of holding full tables from both transits, and it is why failover later costs almost nothing.
The full inbound chain from a transit does three sanity checks before it ever sets preference — reject implausible prefix lengths, reject bogons, reject our own space coming back at us — then tags and accepts:
/routing filter rule
add chain=SANITY-V4 rule="if (dst-len < 8 || dst-len > 24) { reject }"
add chain=SANITY-V4 rule="if (dst in BOGONS-V4) { reject }"
add chain=SANITY-V4 rule="if (dst in 203.0.113.0/24) { reject }"
add chain=TRANSIT-A-IN-V4 rule="jump SANITY-V4"
add chain=TRANSIT-A-IN-V4 rule="set bgp-local-pref 100; set bgp-communities 64500:100; accept"
Transit B’s chain is identical but sets bgp-local-pref 90. The IX chains set 200 (I want to reach a peer directly across the exchange, not pay a transit for it), and customer routes get 300 — customers are always most preferred, because their traffic is the business.
The golden rule, and what breaks without it
Here is the single most important thing in this entire article: never announce a route you learned from one transit or peer to another transit or peer. Your job is to announce your own space and your customers’ space, full stop. Get this wrong and you tell the entire internet “route through me,” and suddenly a small edge router is carrying traffic between two Tier-1s. That is not hypothetical — it is the mechanism behind most of the big BGP leak incidents you have read about.
My outbound chain toward every upstream and IX enforces it: accept our aggregate, accept anything tagged with the customer community 64500:300, reject everything else.
/routing filter rule
add chain=UPSTREAM-OUT-V4 rule="if (dst in 203.0.113.0/24 && dst-len == 24) { accept }"
add chain=UPSTREAM-OUT-V4 rule="if (bgp-communities includes 64500:300) { accept }"
add chain=UPSTREAM-OUT-V4 rule="reject"
Does it work? I asked Transit A what it hears from us, by looking at only the routes whose AS-path starts with our 64500:
sudo docker exec clab-isp-bgp-transit-a vtysh -c 'show ip bgp regexp ^64500'
Exactly three prefixes leave us — our aggregate and our two customers, nothing else:
     Network          Next Hop        Path
 *>  198.18.0.0/24    198.51.100.0    64500 64600 i
 *>  198.18.1.0/24    198.51.100.0    64500 64610 i
 *>  203.0.113.0/24   198.51.100.0    64500 i
Displayed 3 routes and 6005 total paths
Now the teaching moment: I removed the filter on purpose to watch the internet leak. Dropping the outbound chain on the IX-A route-server session and asking the route server how many routes it now hears from us:
/routing/bgp/connection/set [find name=ixa-rs-v4] output.filter-chain=""
Before the change the route server accepted 3 routes from us; after, its own birdc route count tells the story:
## BEFORE
3 of 4 routes for 4 networks in table master4
## AFTER (filter removed)
3005 of 3006 routes for 3006 networks in table master4
We just dumped our entire table onto the internet exchange fabric — every route we learned from Transit B, offered to the IX as if we were transit for it. Putting the filter back drops it to 3 again, instantly. That one reject at the end of the outbound chain is the difference between an ISP and an internet-wide incident.
AS-path prepending toward the backup
I want Transit B to be the backup for inbound traffic too, not just outbound. So on the way out to Transit B I prepend our AS twice, making the path through B look longer and less attractive to the rest of the world:
add chain=TRANSIT-B-OUT-V4 rule="if (dst in 203.0.113.0/24 && dst-len == 24) { set bgp-path-prepend 2; accept }"
add chain=TRANSIT-B-OUT-V4 rule="if (bgp-communities includes 64500:300) { set bgp-path-prepend 2; accept }"
add chain=TRANSIT-B-OUT-V4 rule="reject"
You can see the effect by following a customer prefix out both transits — on the host, ask each transit what path it holds for Customer 1’s 198.18.0.0/24:
sudo docker exec clab-isp-bgp-transit-a vtysh -c 'show ip bgp 198.18.0.0/24'
sudo docker exec clab-isp-bgp-transit-b vtysh -c 'show ip bgp 198.18.0.0/24'
Transit A holds the path 64500 64600; Transit B holds 64500 64500 64600 for the identical prefix — our AS appears twice, the prepend doing its job:
## transit-a:   64500 64600
## transit-b:   64500 64500 64600
Filtering: showing each reject
The inbound sanity chain rejects a whole class of bad routes. Rather than trust that it works, I injected each kind of junk from a transit and confirmed none of it reached the edge. On the host, I originated three bad routes on Transit A — 10.0.0.0/8 (a bogon), 100.66.0.0/25 (longer than /24), and 203.0.113.0/24 (our own space):
sudo docker exec clab-isp-bgp-transit-a vtysh -c 'conf t' \
  -c 'ip route 10.0.0.0/8 blackhole' -c 'ip route 100.66.0.0/25 blackhole' \
  -c 'router bgp 64510' -c 'address-family ipv4 unicast' \
  -c 'network 10.0.0.0/8' -c 'network 100.66.0.0/25' -c 'network 203.0.113.0/24'
I did the same for an unowned prefix from Customer 1 (8.8.8.0/24, on clab-isp-bgp-cust1 under router bgp 64600). Then, on the edge, I looked each one up:
/ip/route/print where dst-address=10.0.0.0/8
An empty table is the whole point — a hit would have printed a dst-address=… line, and instead you get just the column header and nothing under it:
Flags: D - DYNAMIC; A - ACTIVE; b - BGP
Columns: DST-ADDRESS, GATEWAY, ROUTING-TABLE, DISTANCE
All three transit prefixes and the customer’s 8.8.8.0/24 came back exactly this empty. To be sure the filter is what stopped them — not that the neighbour never sent them — I checked the sending side: Transit A’s advertised-routes list did contain 100.66.0.0/25 and 203.0.113.0/24, and Customer 1’s did contain 8.8.8.0/24. They were offered; we refused. And our own 203.0.113.0/24 on the edge stayed our local blackhole, never overwritten by the transit’s forged copy:
 0  As + ;;; our IPv4 aggregate
        dst-address=203.0.113.0/24 blackhole distance=1
One filter I want to be honest about: a production edge also rejects any AS-path containing a private ASN (64512–65534). I can’t apply that here, because this lab’s own ASNs (64500–64999, from the RFC 5398 documentation range) overlap the private range — the filter would reject my own transits and customers. That is a limitation of building only from documentation numbers, not a gap in the technique; on real infrastructure with real public ASNs, that rule belongs in the inbound chain.
Max-prefix, and a RouterOS quirk worth knowing
Every customer session carries a max-prefix limit — a customer that suddenly announces the whole internet at you (misconfiguration or compromise) should tear the session down, not melt your router. The real config sets a sane limit per the plan (100 for a customer); to force the demo I dropped Customer 1’s limit to 2, on the edge:
/routing/bgp/connection/set [find name=cust1-v4] input.limit-process-routes-ipv4=2
Then, on the host, I had Customer 1 announce two more prefixes (three total, over the limit of 2):
sudo docker exec clab-isp-bgp-cust1 vtysh -c 'conf t' \
  -c 'ip route 198.18.0.0/25 blackhole' -c 'ip route 198.18.0.128/25 blackhole' \
  -c 'router bgp 64600' -c 'address-family ipv4 unicast' \
  -c 'network 198.18.0.0/25' -c 'network 198.18.0.128/25'
The session dropped, and the edge’s session detail (/routing/bgp/session/print detail where name="cust1-v4-1") recorded exactly why — the notification code ends 03 06 01, which is BGP Cease, subcode 1, “Maximum Number of Prefixes Reached”:
name="cust1-v4-1"
  .last-notification=...030601
  limit-exceeded   last-stopped=2026-07-19 12:49:49   prefix-count=0
That is the correct behaviour, and it fired cleanly. The recovery surprised me, and it is worth a warning: on RouterOS 7.23, once a session enters limit-exceeded, that state is sticky. Withdrawing the excess routes, raising the limit, even disabling and re-enabling the connection did not clear it — the session sat in limit-exceeded with frozen timestamps. What reliably cleared it was recreating the connection (a full BGP restart also does it). So: max-prefix protects you exactly as designed, but budget for a deliberate operator action to bring the peer back, not an automatic recovery.
Internet exchange peering: route servers vs. bilateral
The two exchanges show the two ways you peer at an IXP, and RouterOS lets you see the difference plainly. At IX-A I peer only with the route server (ixa-rs, AS64530), a BIRD instance — which is what most real exchanges run. The member ixa-peer (AS64550) originates 198.18.200.0/24. When that route reaches my edge, I looked at how it arrived:
/routing/route/print detail where dst-address=198.18.200.0/24 && active
The revealing detail is the AS-path and the next hop:
 Ab  dst-address=198.18.200.0/24 gateway=192.0.2.20
     bgp.session=ixa-rs-v4-1 .as-path="64550" .communities=64500:200 .local-pref=200
I learned it on the session with the route server (ixa-rs-v4-1, AS64530), yet the AS-path is just 64550 — the route server did not insert its own AS — and the next hop is 192.0.2.20, the peer’s own address, not the route server’s. That transparency is the entire reason route servers scale an exchange: they glue hundreds of members together without ever appearing in a path. At IX-B I also run a bilateral session directly with the member (AS64570), and that same prefix shows up learned two ways — via the route server and directly — both carrying 64570. Real exchanges are a mix of both, and now you can tell them apart in your own table.
Dual-stack, everywhere
None of this is IPv4-only. Every session, filter, and policy above has an IPv6 twin, and the data plane proves it. From the customer VM, reaching the simulated internet over IPv6:
sudo docker exec clab-isp-bgp-custvm ping -6 -c3 2001:db8:ffff:100::200
64 bytes from 2001:db8:ffff:100::200: seq=1 ttl=61 time=1.211 ms
64 bytes from 2001:db8:ffff:100::200: seq=2 ttl=61 time=0.303 ms
3 packets transmitted, 3 packets received, 0% packet loss
And a traceroute the whole way out shows the real path — customer LAN, customer router, our edge, Transit A, the destination:
sudo docker exec clab-isp-bgp-custvm traceroute -6 -n 2001:db8:ffff:100::200
 1  2001:db8:1000::1    0.008 ms
 2  2001:db8:c001::1    0.197 ms
 3  2001:db8:ffff:1::2  0.219 ms
 4  2001:db8:ffff:100::200  0.241 ms
One IPv6-specific honesty note. On IPv4 the “internet” (100.64/10) and our own space (203.0.113.0/24) are obviously different blocks, so filtering our own prefix back out is clean. On IPv6 there is only one documentation prefix in existence — 2001:db8::/32 — so in this lab both “us” and “the internet” have to live inside it. That forces the v6 own-prefix filter to match only our exact /32 aggregate rather than the whole block, and it is a quirk of building from documentation space, not something you would hit with a real, globally-unique IPv6 allocation.
Failure and convergence: the 3 a.m. test
The reason you hold full tables from both transits is so a failure is a non-event. I measured it. On the host, I started a ping every 100 ms from the customer to the internet:
sudo docker exec clab-isp-bgp-custvm ping -c 250 -i 0.1 198.51.100.200
Then, on the edge, I dropped the Transit A link partway through and restored it a few seconds later:
/interface disable ether2
/interface enable ether2
During the outage, the same internet prefix was already active via Transit B — no reconvergence delay, because the backup path was sitting in the table the whole time:
DIb 198.51.100.0/24  198.51.100.1   (Transit A, now inactive)
DAb 198.51.100.0/24  198.51.100.3   (Transit B, now active)
A traceroute during the window confirmed the data plane had moved to Transit B (198.51.100.3). Counting the missing sequence numbers in that 250-ping run (each gap is 0.1 s wide), my measurement of the full cycle came out as:
- Link down → failover to Transit B: 1 packet lost (~0.1 s, sub-second).
- Link up → fail back to Transit A: 31 packets lost (~3.1 s).
Losing a transit cost a single packet — the backup was pre-installed, so the switch was almost instantaneous. Bringing it back cost more, around three seconds, because the edge had to relearn 3,000 prefixes from Transit A and re-run best-path. That asymmetry is real and worth internalising: link-down failover is cheap, link-up restoration is not, which is exactly why operators dampen flapping links instead of trusting an instant fail-back. (Faster still is possible with BFD for sub-second detection of failures that don’t drop the link — I note that as the next thing to add.)
What’s real, what’s simulated, and what I didn’t build
The SPEC for this lab was much larger than a single article can honestly build and verify, so I built the BGP core to full depth and I am going to be straight about the rest rather than fake it. Here is the honest ledger.
Fully built and verified in this run (every capture above is from it): the dual-transit multihoming and best-path selection; local-preference, communities, and AS-path prepending; the golden-rule outbound filter and a live route-leak demonstration; inbound bogon / prefix-length / own-prefix / unowned-customer filtering; max-prefix teardown; IX route-server transparency versus bilateral peering; downstream BGP customers (full-transit and default-only); full dual-stack; and failure/convergence measurement.
Genuinely not simulatable — real-world workflow instead. Some things require a Regional Internet Registry and cannot be faked in a lab, and pretending otherwise would be the one unforgivable move here:
- RPKI origin validation. Real Route Origin Authorizations are cryptographically signed by a RIR (for this region, AFRINIC) and validated against the global RPKI. You cannot mint a valid ROA for documentation space. In production you run a validator (Routinator or StayRTR), point RouterOS at it over the RTR protocol, and add an
rpkimatch to the inbound chain to reject Invalids and prefer Valids over NotFound. I did not stand a validator up in this run. - IRR-based prefix lists. In the real world you don’t hand-write customer prefix lists; you generate them from IRR AS-SET data with
bgpq4on a schedule. The lab hard-codes the equivalent filters. The technique is real; the automation against a live IRR is a separate build. - A real transit contract and real peering. Local-pref of 100 vs 90 stands in for a commercial relationship; there is no invoice behind it.
Deliberately cut for scope, to build the core properly — each is real ISP work, just not in this run: uRPF / BCP38 anti-spoofing on customer ports; RTBH blackhole signalling; PPPoE + RADIUS residential subscribers with IPv6 prefix delegation; the switching layer (802.1Q trunking, LACP, DHCP snooping, storm control — containerlab’s Linux bridges can’t demonstrate real switch-CLI features honestly); and the operational services (recursive/authoritative DNS, NTP, a looking glass, LibreNMS, NetFlow). All of these are planned extensions of the lab tree, in that order of likelihood.
If you want to monitor the edge you build here the way you would a production router, that is a solved problem and worth doing — I’ve written up How to Monitor a MikroTik Router with Prometheus and Grafana separately, and a lightweight self-hosted option in How to Self-Host Uptime Kuma for Free Server Monitoring with Docker.
Where to run this for real
The lab itself is free — free software, free RouterOS CHR (capped at 1 Gbps, which is irrelevant for a control-plane lab), documentation address space. The only thing you have to supply is a host with real RAM and, critically, real KVM. A shared VPS usually won’t expose nested virtualization, so for a lab like this — or for the real router VMs behind a small ISP or enterprise edge — the honest fit is a bare-metal box you fully control. Lineserve’s dedicated servers (LineServe Core) give you that: RAM to hold real full tables, a real kernel with KVM, and out-of-band IPMI, hosted in Nairobi, Dar es Salaam, or Lagos with local billing in KES, TZS, or NGN. If you’re standing up the Linux host first, my Initial Ubuntu 24.04 Server Setup: Users, SSH, Firewall and 8 Essential Security Steps for Every Production VPS walkthroughs get the box ready before you clone the lab, and Getting Started with Lineserve Cloud: Launch Your First VPS covers provisioning if you’re new to the console.
Wrapping up
Two BGP sessions are not multihoming. The policy is: which upstream wins and why, what you announce and — far more importantly — what you refuse to, how a customer’s routes propagate to the world, and how the network behaves when a link dies. I built all of that on a MikroTik CHR you can boot on one Linux box, and every command and every line of output above came off the running lab. Clone the tree, run ./deploy.sh, and break it yourself — pulling a transit link and watching a single packet drop teaches more than any diagram can.