Self-Host Nextcloud: Your Own Google Drive Alternative
Run Nextcloud on your own VPS with Docker Compose: real HTTPS, data that survives a reboot, a tested backup, and an honest cost verdict.
Google Drive is a good product. If you are looking for a cheaper Drive, self-hosting is probably not it — we will do that arithmetic honestly further down, and at small storage sizes Google wins. What self-hosting buys you is different: the files sit on a machine you rent, in a country you chose, under a login only you issue, with no per-user tax when your team grows from three people to eight.
This guide stands up Nextcloud on one Linux VPS using Docker Compose. By the end you will have a real HTTPS address, files that survive a reboot, and a backup you have actually restored from rather than assumed.
Everything here was run start to finish on a fresh Ubuntu 24.04 server in the Lineserve lab. Every output block below is captured from that run — including the failures, which are the interesting part. Because those blocks are real, they show the lab’s own address (nextcloud.lab.lineserve.africa, IP 18.212.243.123) rather than a made-up one. You will use your own domain everywhere you type a command; only the pasted results are the lab’s.
Who this is for
You can open a terminal and paste a command. That is the assumed starting point. You do not need to know Docker — every term is defined at the point it first matters — but you do need a domain name you control, because without one there is no HTTPS, and without HTTPS you would be sending your own files across the internet in the clear.
Should you actually self-host?
The honest version, before you spend an evening on this:
Self-host if you want your data in a specific country, you are tired of per-user pricing, you want to hand accounts to a team without buying seats, or you want the file storage to be yours the day you stop paying anyone.
Do not self-host if you want the cheapest 100 GB, or if nobody on your side will run the backup and apply updates. Nextcloud is not a fire-and-forget appliance. It is a server you now own, with everything that implies. If that sentence makes you tired, buy the Google plan — that is a legitimate answer and this guide would rather you know it now than in month four.
What you need before you start
- A VPS running Ubuntu 24.04, with at least 2 GB of RAM. The lab ran on 2 GB and every service fits comfortably.
- A normal user account with
sudoon that server — not root. Everything below is typed as that user. If you have only a root shell, make yourself a normal user first: Initial Ubuntu 24.04 Server Setup: Users, SSH, Firewall covers exactly that, plus SSH keys. - A domain name you control, where you can add a DNS record. This guide uses
nextcloud.example.com. - Disk space for your files. This is the one people get wrong. Docker’s images for this stack alone take about 2.8 GB before you upload a single file, so a 20 GB disk gives you roughly 15 GB of actual Drive. Size the disk for the files you plan to keep, not for the software.
Conventions used in this guide
Everything you must replace is listed here once, with the value this guide uses throughout. Substitute your own as you go.
| Thing | This guide uses | Yours |
|---|---|---|
| Your domain | nextcloud.example.com |
the domain you own |
| A second domain, added as an example later | drive.example.com |
any extra domain you add |
| Your server’s public IP | 203.0.113.10 |
your VPS’s IP |
| Server login user | ubuntu |
your sudo user |
| Project directory | /home/ubuntu/nextcloud |
same, under your user’s home |
| Nextcloud admin username | nimo |
your choice — it appears inside file paths later, so remember it |
| Test file you will upload | invoice-notes.txt |
use this name so the checks below match |
| Email for the certificate | [email protected] |
your real email |
You invent exactly one password in this guide: the Nextcloud admin password in Step 8. The database passwords are generated for you and you will never type them.
Step 1: Point your domain at your server
Do this first. It takes a few minutes to take effect across the internet — propagation, in DNS jargon — and the certificate step later will fail without it.
In your domain registrar’s or DNS provider’s control panel, add an A record:
| Field | Value |
|---|---|
| Type | A |
| Name | nextcloud (giving you nextcloud.example.com) |
| Content / Points to | 203.0.113.10 — your server’s IP |
| Proxy / CDN | off |
| TTL | automatic, or 60 seconds |
Turn any “proxy” or “cloud” toggle off. A proxy intercepts the certificate check in Step 7 and it will not complete.
You will check that this worked in the next step, from the server itself, where the tool for the job is guaranteed to exist.
Step 2: Log in to your server and check DNS
From your own computer:
ssh [email protected]
Confirm who and where you are:
whoami
pwd
ubuntu
/home/ubuntu
If whoami prints root, stop and make a normal user first (see the prerequisites). Working as root produces commands that quietly do not work for anyone who is not root.
Now install the DNS lookup tool and check your record. Doing this on the server, rather than your own laptop, sidesteps the question of whether your laptop has the tool — Windows does not ship it:
sudo apt-get update
sudo apt-get install -y dnsutils
dig +short nextcloud.example.com
You want your server’s IP and nothing else:
18.212.243.123
If this prints nothing, DNS has not taken effect yet — wait a few minutes and run it again. Do not move on until this returns your server’s IP, because every step after this depends on it.
Step 3: Install Docker
Docker runs applications in containers: self-contained bundles with the app and everything it needs inside. It means you never install PHP, a database, or a web server onto your server by hand — you describe what you want and Docker fetches it.
Ubuntu’s own repositories carry an old, differently-named Docker. Use Docker’s official repository instead. Paste these one block at a time.
Add Docker’s signing key, which lets apt verify the packages are genuinely Docker’s:
sudo apt-get install -y ca-certificates curl
sudo install -m 0755 -d /etc/apt/keyrings
sudo curl -fsSL https://download.docker.com/linux/ubuntu/gpg -o /etc/apt/keyrings/docker.asc
sudo chmod a+r /etc/apt/keyrings/docker.asc
Add the repository itself. This is one long command — copy the whole thing:
echo "deb [arch=$(dpkg --print-architecture) signed-by=/etc/apt/keyrings/docker.asc] https://download.docker.com/linux/ubuntu $(. /etc/os-release && echo "$VERSION_CODENAME") stable" | sudo tee /etc/apt/sources.list.d/docker.list > /dev/null
sudo apt-get update
Install Docker and the Compose plugin:
sudo apt-get install -y docker-ce docker-ce-cli containerd.io docker-buildx-plugin docker-compose-plugin
Confirm both are present:
docker --version
docker compose version
Docker version 29.6.2, build dfc4efb
Docker Compose version v5.3.1
Two version numbers means you are done. Your patch numbers will differ; that is fine. If docker compose version reports “command not found”, the docker-compose-plugin package did not install — re-run the install command and read its output.
Step 4: Let your user talk to Docker
Try to list running containers:
docker ps
permission denied while trying to connect to the docker API at unix:///var/run/docker.sock
That is expected on a fresh install, and it is not a mistake you made. Docker is controlled through a socket — a special file, here /var/run/docker.sock, that programs talk to instead of a network port — and that file is owned by root. Add yourself to the docker group so you are allowed to use it:
sudo usermod -aG docker $USER
Now the part that catches everyone: your current shell still has your old group list, so docker ps keeps failing until you start a new session. Log out and back in:
exit
ssh [email protected]
Now it works:
docker ps
CONTAINER ID IMAGE COMMAND CREATED STATUS PORTS NAMES
An empty table with only headers is success — you have no containers yet, and you can now talk to Docker.
Worth knowing once, plainly: anyone in the docker group can start a container that mounts the whole filesystem, which means membership of the docker group is equivalent to root on this machine. On a single-admin server that is the normal trade-off and it is why we did not just run everything with sudo. Do not add people to this group that you would not hand the root password.
Step 5: Create the project directory
Everything for this stack lives in one folder. Make it and move into it:
mkdir -p ~/nextcloud
cd ~/nextcloud
pwd
/home/ubuntu/nextcloud
Every remaining command in this guide is run from this directory. If you come back tomorrow and something fails, check pwd first — it is the single most common cause.
Step 6: Write the configuration files
Three files go in this folder: .env for your settings and passwords, Caddyfile for the HTTPS layer, and compose.yaml describing the services.
The .env file
Create it with cat, which writes everything up to the closing EOF into the file. Change the first two lines to your own domain and email before you press Enter — the block is written literally, so whatever you paste is what lands in the file:
cat > .env <<'EOF'
NEXTCLOUD_DOMAIN=nextcloud.example.com
[email protected]
DB_ROOT_PASSWORD=changeme
DB_PASSWORD=changeme
EOF
Now replace both changeme placeholders with strong random passwords, generated for you:
sed -i "s/^DB_ROOT_PASSWORD=.*/DB_ROOT_PASSWORD=$(openssl rand -base64 24 | tr -d '/+=')/" .env
sed -i "s/^DB_PASSWORD=.*/DB_PASSWORD=$(openssl rand -base64 24 | tr -d '/+=')/" .env
chmod 600 .env
chmod 600 means only your user can read the file. Check the result:
cat .env
NEXTCLOUD_DOMAIN=nextcloud.example.com
[email protected]
DB_ROOT_PASSWORD=oPQ3nZxKq7RmT2vY8wLbJdHc
DB_PASSWORD=mK9tW4pXbN6zQvR3sJfLdY2a
Two things to confirm. The passwords must be long random strings — if they still say changeme, re-run the two sed commands. And the domain line must say your domain — if it still says nextcloud.example.com, fix it now with nano .env, then save and exit with Ctrl+O, Enter, Ctrl+X.
The Caddyfile
Caddy is a web server that sits in front of Nextcloud and handles HTTPS. It is here because it obtains and renews a free Let’s Encrypt certificate on its own, with no separate certbot step and no renewal job to forget.
cat > Caddyfile <<'EOF'
{$NEXTCLOUD_DOMAIN} {
    tls {$TLS_EMAIL}

    redir /.well-known/carddav /remote.php/dav 301
    redir /.well-known/caldav /remote.php/dav 301

    reverse_proxy app:80
}
EOF
Nothing to edit here — {$NEXTCLOUD_DOMAIN} and {$TLS_EMAIL} are read from your .env. The two redir lines are what let phone calendar and contacts apps find the server. We add one more line to this file in Step 10, once Nextcloud has told us it wants it.
The compose.yaml
This is the artifact — the whole stack in one file. Paste it as-is:
cat > compose.yaml <<'EOF'
services:
  db:
    image: mariadb:11.4
    restart: always
    command: --transaction-isolation=READ-COMMITTED --log-bin=binlog --binlog-format=ROW
    volumes:
      - db_data:/var/lib/mysql
    environment:
      MARIADB_ROOT_PASSWORD: ${DB_ROOT_PASSWORD}
      MARIADB_DATABASE: nextcloud
      MARIADB_USER: nextcloud
      MARIADB_PASSWORD: ${DB_PASSWORD}

  redis:
    image: redis:8-alpine
    restart: always

  app:
    image: nextcloud:34-apache
    restart: always
    depends_on:
      - db
      - redis
    volumes:
      - nextcloud_data:/var/www/html
    environment:
      MYSQL_HOST: db
      MYSQL_DATABASE: nextcloud
      MYSQL_USER: nextcloud
      MYSQL_PASSWORD: ${DB_PASSWORD}
      REDIS_HOST: redis
      NEXTCLOUD_TRUSTED_DOMAINS: ${NEXTCLOUD_DOMAIN}
      TRUSTED_PROXIES: 172.16.0.0/12
      OVERWRITEPROTOCOL: https
      OVERWRITECLIURL: https://${NEXTCLOUD_DOMAIN}

  caddy:
    image: caddy:2-alpine
    restart: always
    depends_on:
      - app
    ports:
      - "80:80"
      - "443:443"
    environment:
      NEXTCLOUD_DOMAIN: ${NEXTCLOUD_DOMAIN}
      TLS_EMAIL: ${TLS_EMAIL}
    volumes:
      - ./Caddyfile:/etc/caddy/Caddyfile:ro
      - caddy_data:/data
      - caddy_config:/config

volumes:
  db_data:
  nextcloud_data:
  caddy_data:
  caddy_config:
EOF
What each piece is doing, since you should not run a file you do not understand:
db— MariaDB, the database holding your users, share links, and file metadata. The--transaction-isolationflag is Nextcloud’s documented requirement, not decoration.redis— an in-memory cache. Without it Nextcloud’s admin page complains about missing memory caching and the interface feels sluggish.app— Nextcloud itself. The-apacheimage has a web server built in, which is one fewer container than the-fpmalternative.fpmis faster under real load; at the scale where that matters you will know, and until thenapacheis fewer moving parts.caddy— HTTPS, as described above.volumes:— the four named storage areas that outlive the containers. This is the part that keeps your files when a container is replaced, and the section “Where your files actually live” proves it.
Every version here is pinned (nextcloud:34-apache, not nextcloud:latest). This is deliberate and it matters more than it looks: Nextcloud can only upgrade one major version at a time. On latest, a routine docker compose pull months from now can hand you a version two majors ahead of your data, which Nextcloud will refuse to start on — and you get to discover this at the worst moment. Pinning means upgrades happen when you decide.
Notice also that db and redis have no ports: section. They are reachable by the other containers and by nothing else. Only Caddy publishes anything. Keep it that way — the “Firewall” section below shows why that decision, and not UFW, is what is actually protecting your database.
Check the file is valid before starting anything:
docker compose config --quiet && echo "compose file is valid"
compose file is valid
That message means the syntax is good. If it prints a parse error instead, a line lost its indentation during the copy — this file format (YAML) treats leading spaces as structure, so they have to survive the paste exactly.
Step 7: Start it
docker compose up -d
Docker downloads the images — a few minutes on a first run — and starts four containers:
 Container nextcloud-db-1 Started
 Container nextcloud-redis-1 Started
 Container nextcloud-app-1 Started
 Container nextcloud-caddy-1 Started
Check what is running:
docker compose ps
NAME                IMAGE                 COMMAND                  SERVICE   CREATED          STATUS          PORTS
nextcloud-app-1     nextcloud:34-apache   "/entrypoint.sh apac…"   app       3 minutes ago    Up 2 minutes    80/tcp
nextcloud-caddy-1   caddy:2-alpine        "caddy run --config …"   caddy     3 minutes ago    Up 2 minutes    0.0.0.0:80->80/tcp, [::]:80->80/tcp, 0.0.0.0:443->443/tcp, [::]:443->443/tcp, 443/udp, 2019/tcp
nextcloud-db-1      mariadb:11.4          "docker-entrypoint.s…"   db        3 minutes ago    Up 2 minutes    3306/tcp
nextcloud-redis-1   redis:8-alpine        "docker-entrypoint.s…"   redis     3 minutes ago    Up 2 minutes    6379/tcp
Four rows, every one saying Up. That is the whole stack for now; a fifth service gets added in Step 11, once this core is proven. If a container says Restarting instead, read its log with docker compose logs db — substituting whichever name is unhappy — and the reason will be in there.
Expect a 502 for the first minute
Load https://nextcloud.example.com too quickly and you get a 502 Bad Gateway. This is normal and it is not broken. On first boot the Nextcloud image unpacks itself into its volume, and Caddy is answering before the app behind it is ready. In the lab it took about 40 seconds:
attempt 1: HTTP 502
attempt 2: HTTP 502
attempt 3: HTTP 502
attempt 4: HTTP 200
Watch it finish rather than guessing:
docker compose logs -f app
Wait until it stops printing, then press Ctrl+C to stop watching. Then confirm:
curl -sI https://nextcloud.example.com | head -3
HTTP/2 200
alt-svc: h3=":443"; ma=2592000
content-security-policy: default-src 'self'; script-src 'self' 'nonce-I4dh0aQvoDGavNCtmr8XL3i6gT0/CThYCCGQt+CtARs='; style-src 'self' 'unsafe-inline'; frame-src *; img-src * data: blob:; font-src 'self' data:; media-src *; connect-src *; object-src 'none'; base-uri 'self';
HTTP/2 200 is the goal. Note you did not have to type -k or dismiss a warning — the certificate is real and already trusted. Caddy requested it from Let’s Encrypt the moment it started:
{"level":"info","msg":"certificate obtained successfully","identifier":"nextcloud.lab.lineserve.africa","issuer":"acme-v02.api.letsencrypt.org-directory"}
If you get a certificate error instead, the cause is almost always Step 1: the DNS record is missing, still propagating, or behind a proxy toggle. Caddy retries by itself, so fix the DNS and watch docker compose logs caddy.
Step 8: Run the setup wizard
Open https://nextcloud.example.com in a browser. You will see this:
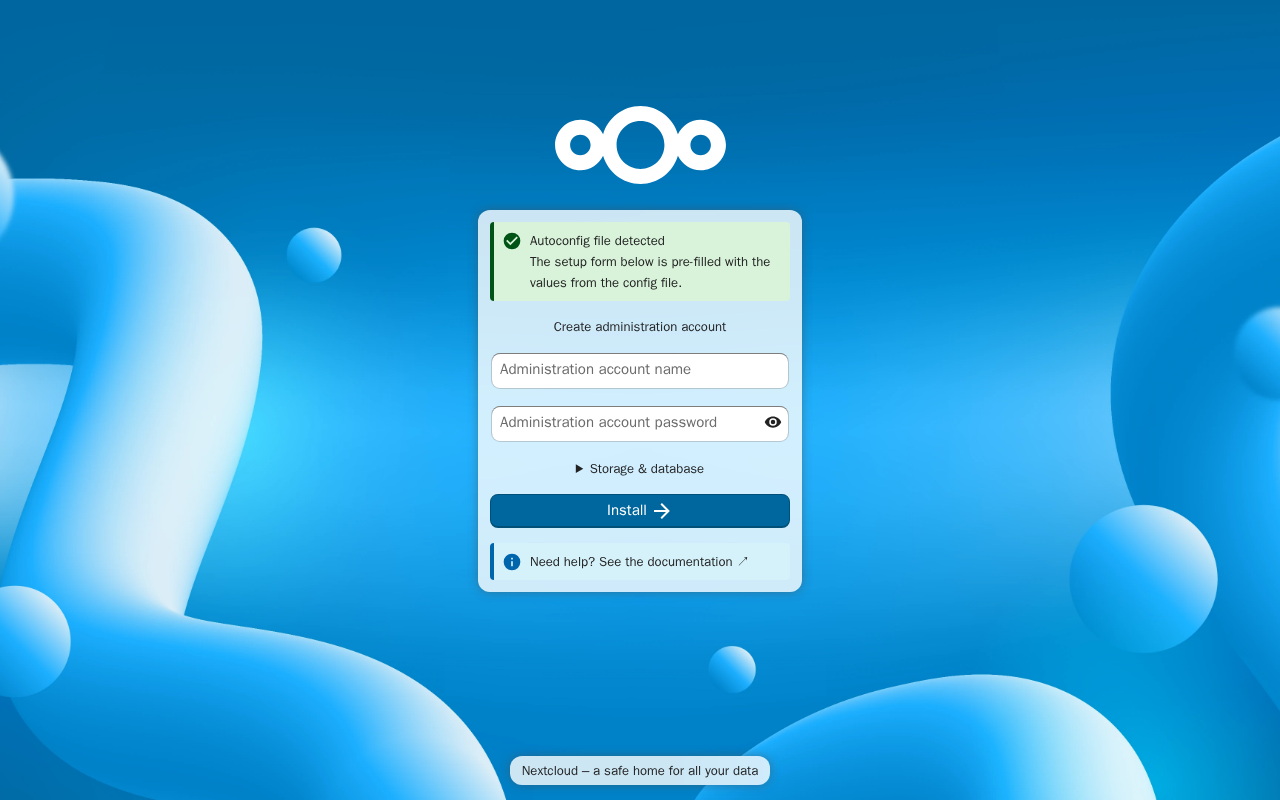
The green “Autoconfig file detected” banner is your compose.yaml doing its job — the database settings arrived from the environment variables, so you are not asked for them.
You can confirm that by clicking Storage & database to expand it:
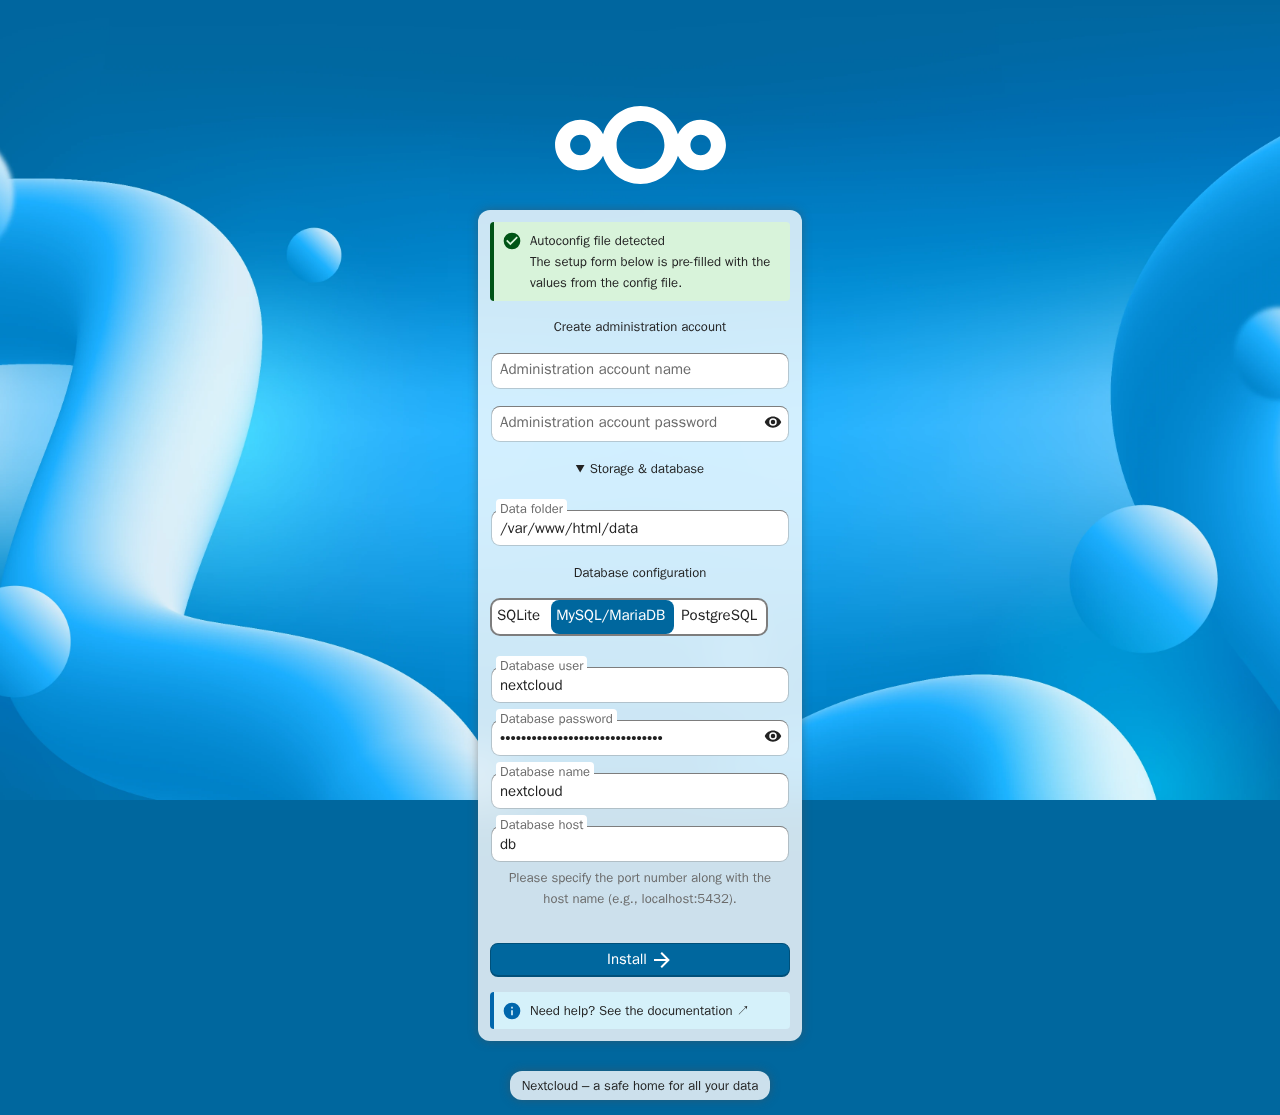
MySQL/MariaDB is already selected, the database host is db (the service name from your compose file), and the password is filled in from .env. Change nothing here. This screen is shown so you can recognise a correct install, not so you can edit it.
Now fill in the two fields at the top: an admin username and a password you choose. This is the account you log in with, and the username becomes a folder name on disk, so keep it simple and remember it. This guide uses nimo.
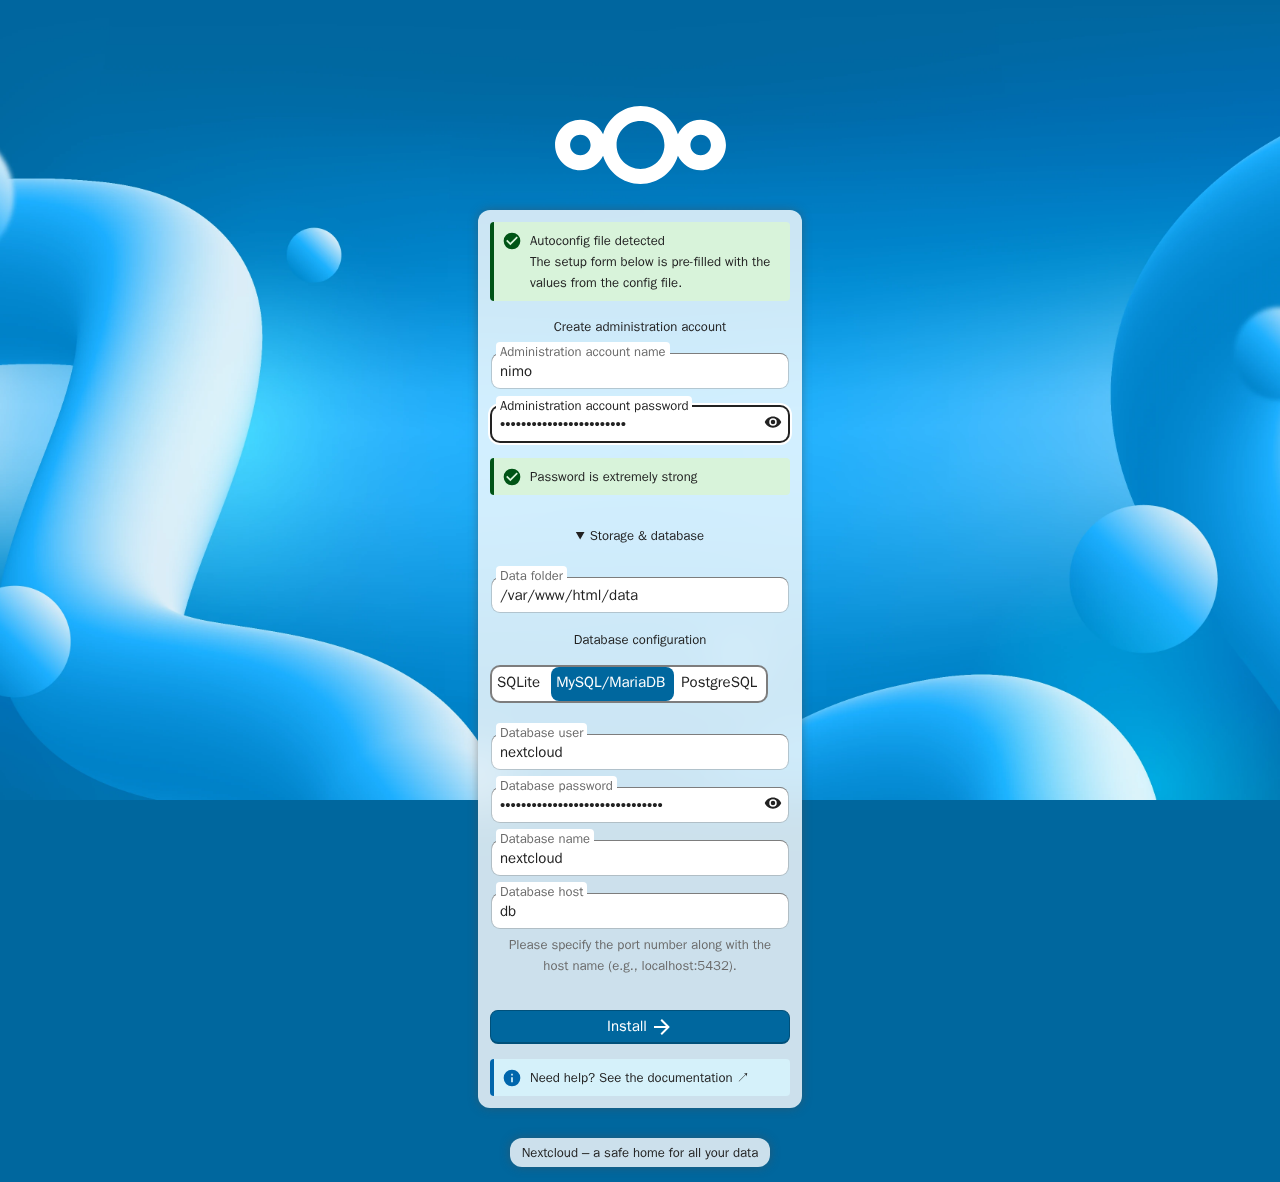
Click Install. This takes a couple of minutes and the page will appear to hang — leave it alone. When it finishes, it drops you at the login screen:
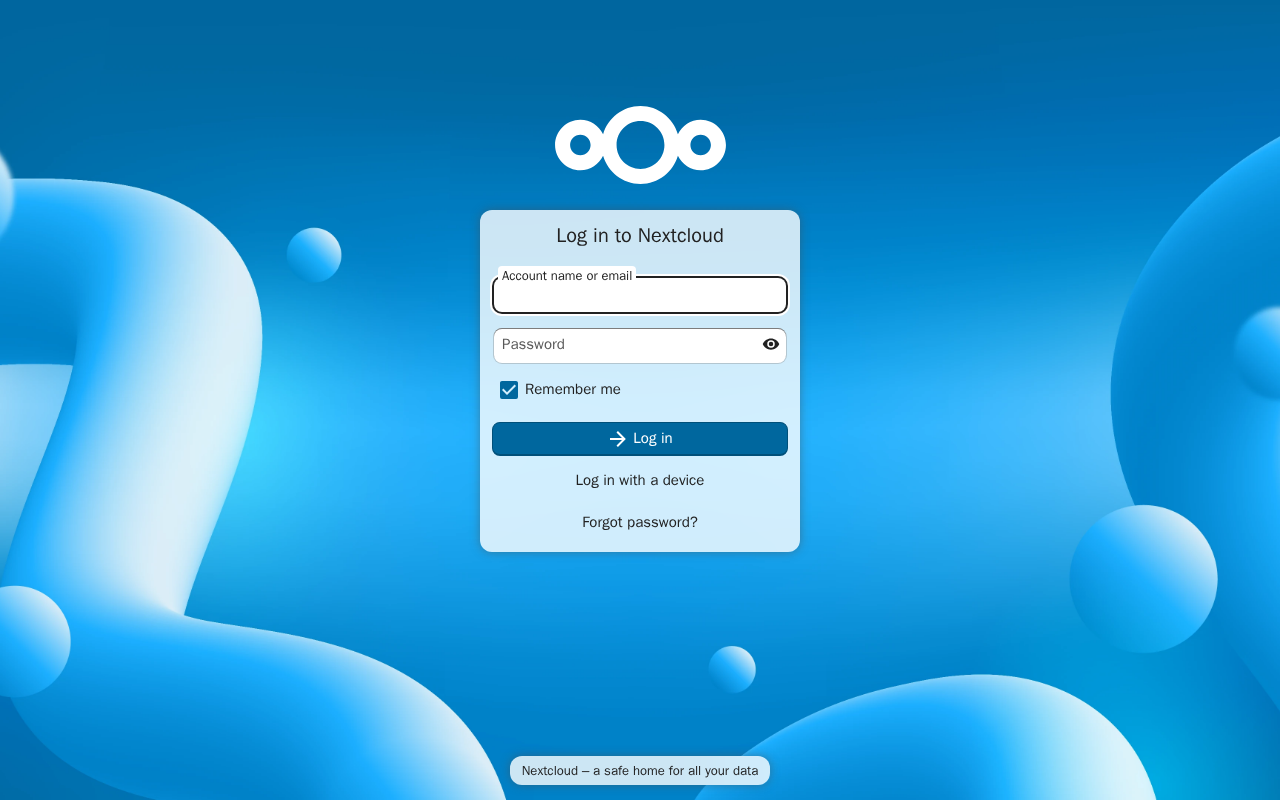
Confirm the install from the server side too:
docker compose exec -u www-data app php occ status
  - installed: true
  - version: 34.0.1.2
  - versionstring: 34.0.1
  - edition:
  - maintenance: false
  - needsDbUpgrade: false
  - productname: Nextcloud
  - extendedSupport: false
installed: true and maintenance: false is a healthy instance.
That command is worth understanding, because the rest of this guide leans on it: occ is Nextcloud’s admin command-line tool. docker compose exec app runs a command inside the running app container, and -u www-data runs it as the web server’s user — which is the only user allowed to touch Nextcloud’s files. Running occ without -u www-data creates root-owned files that break the app later.
Step 9: Log in and upload a file
Log in with the username and password you just chose.

A welcome panel appears over the dashboard the first time — read it, or close it with the × in its top-right corner.
Open Files from the grid icon in the top-left. Now upload something, because the sections below check that a file of yours survives being destroyed and restored: click + New → Upload files and choose any small file from your computer. Name it invoice-notes.txt so the commands below match what you see. Your Files view should then look like this:
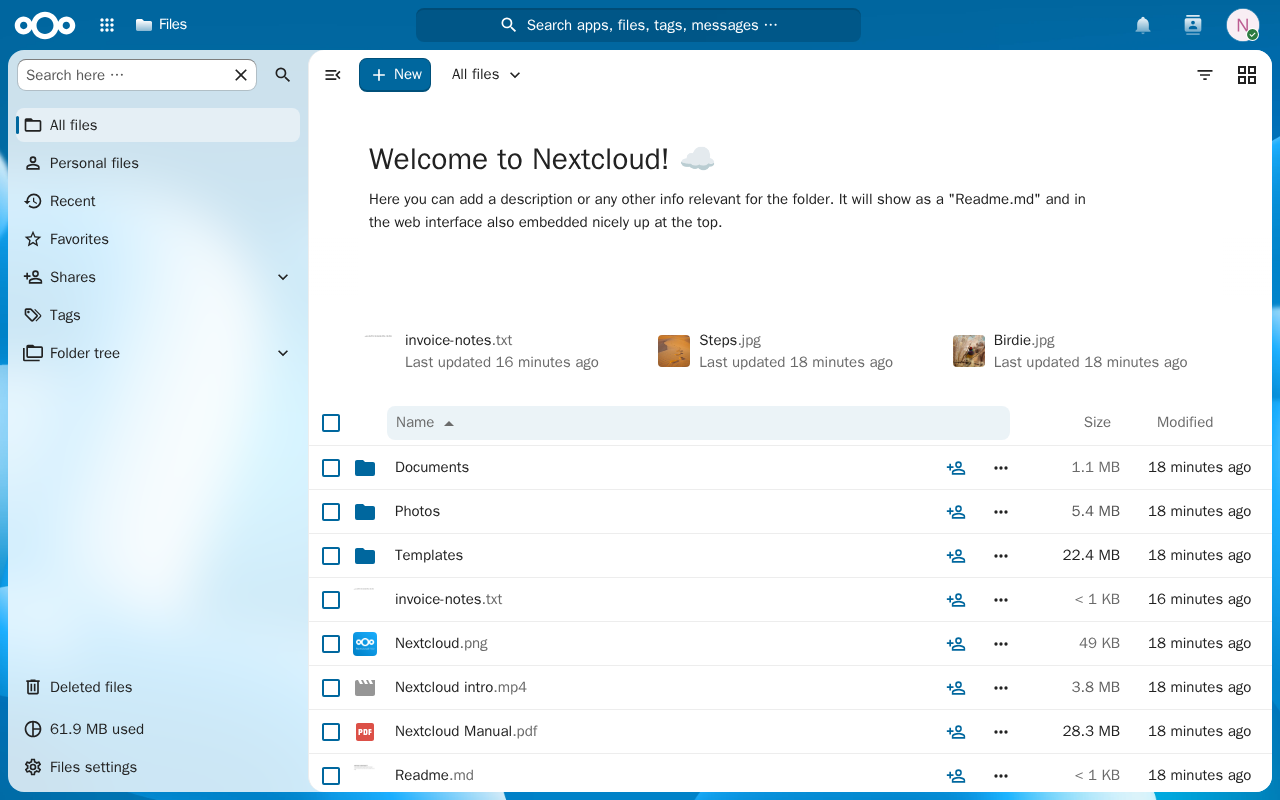
That is a working Drive. The folders and sample files are Nextcloud’s own; invoice-notes.txt is the uploaded file, and it is about to earn its keep.
Step 10: Finish the install — clear the setup warnings
Your Nextcloud works, but it is not finished. Go to https://nextcloud.example.com/settings/admin/overview — the same page as clicking your avatar in the top right → Administration settings → Overview, and the direct link saves the hunt. Nextcloud grades its own installation, and a fresh one always has notes:
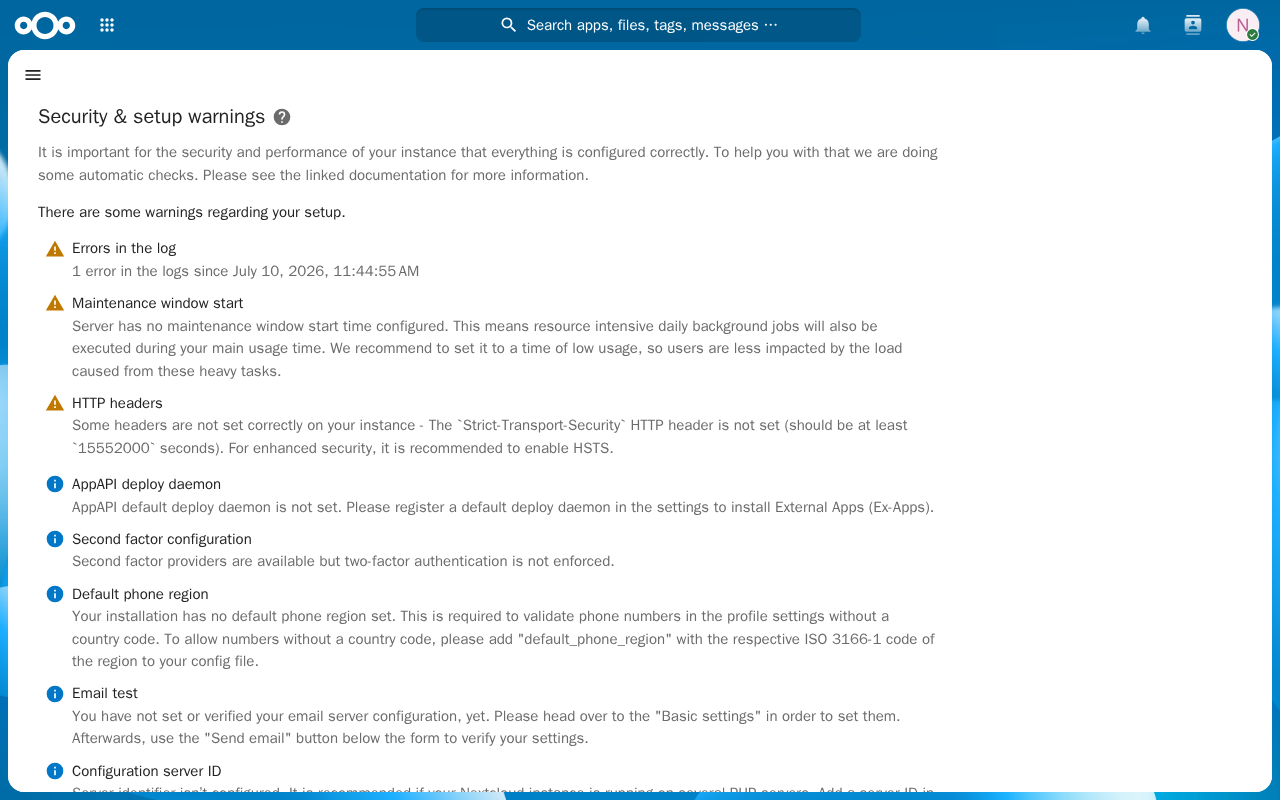
These are worth doing, not ignoring. Three fixes clear the ones that matter.
Add the HSTS header Nextcloud is asking for. The HTTP headers warning wants Strict-Transport-Security, which tells browsers to only ever reach your site over HTTPS. Caddy sets it once you say so. Rewrite the Caddyfile with the extra header line:
cat > Caddyfile <<'EOF'
{$NEXTCLOUD_DOMAIN} {
    tls {$TLS_EMAIL}

    header Strict-Transport-Security "max-age=31536000; includeSubDomains"

    redir /.well-known/carddav /remote.php/dav 301
    redir /.well-known/caldav /remote.php/dav 301

    reverse_proxy app:80
}
EOF
Caddy only reads that file when it starts, so restart it, then check the header is really on the wire:
docker compose restart caddy
curl -sI https://nextcloud.example.com | grep -i strict-transport
strict-transport-security: max-age=31536000; includeSubDomains
If grep prints nothing the header is not being sent — the Caddyfile did not save, or Caddy did not restart.
Set a maintenance window so Nextcloud runs its heavy nightly jobs at a quiet hour, and a default phone region so contact phone numbers without a country code are understood. Use your own country’s two-letter code — KE for Kenya, TZ for Tanzania, NG for Nigeria:
docker compose exec -u www-data app php occ config:system:set default_phone_region --value=KE
docker compose exec -u www-data app php occ config:system:set maintenance_window_start --type=integer --value=1
System config value default_phone_region set to string KE
System config value maintenance_window_start set to integer 1
Reload the Overview page and those warnings are gone:
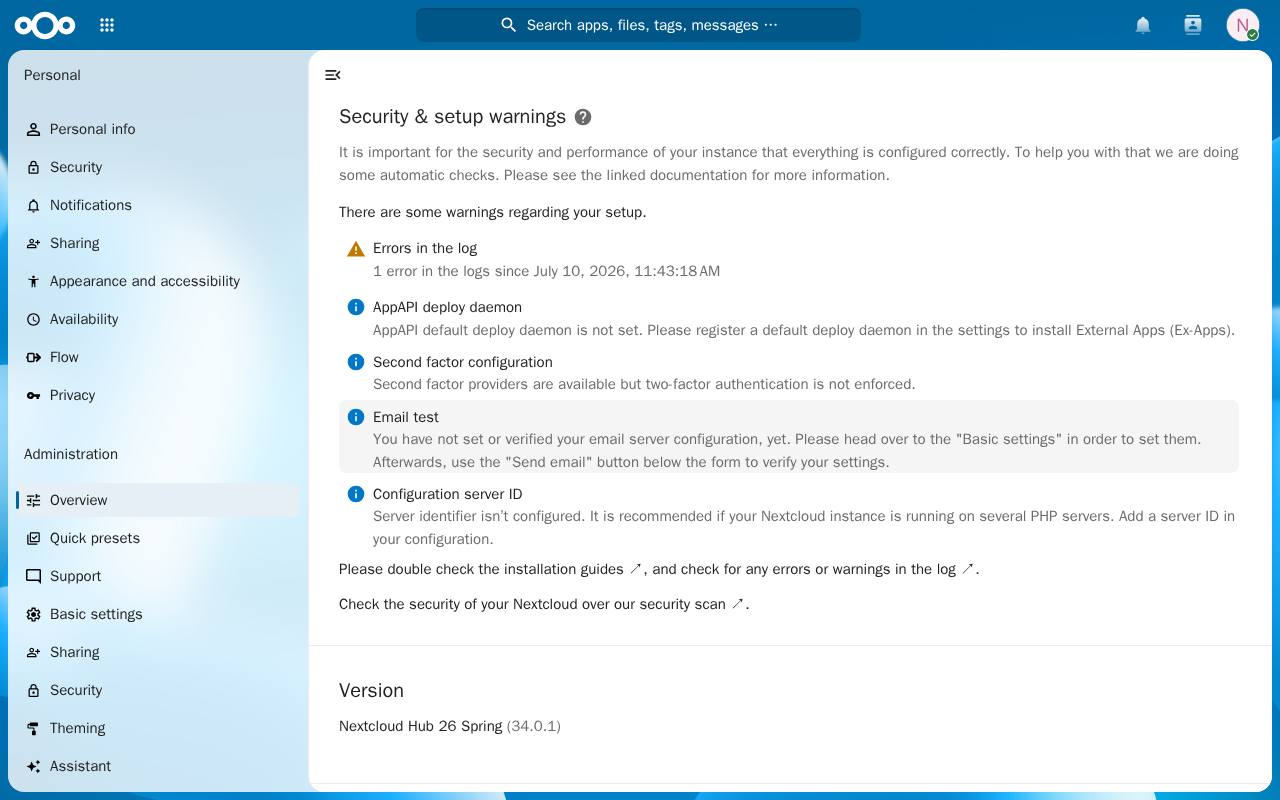
The remaining blue ⓘ items are informational, not problems: they point at optional things like configuring an email server and enforcing two-factor authentication. Both are good ideas for a real deployment; neither blocks you today.
Nextcloud may also list Mimetype migrations available on a fresh install — the lab’s did. It is housekeeping, not a fault, and this clears it:
docker compose exec -u www-data app php occ maintenance:repair --include-expensive
It prints a long list of repair steps as it works, ending something like this:
 - Force-reset all Text document sessions
 - Initialize migration of background images from dashboard to theming app
 - Add background job to check for backup codes
 - Populating added database structures for workflows
Returning to a prompt with no error is success.
Step 11: Add the background-jobs container
The core stack works, so now add the piece that keeps it healthy over time. Nextcloud has to run scheduled jobs — cleaning up deleted files, sending notifications, generating previews. Out of the box those only fire when somebody happens to load a page in a browser, which on a private Drive can mean almost never.
The fix is a fifth container running the same Nextcloud image with its scheduler as the entry point. Open your compose file:
nano compose.yaml
Add this block immediately above the caddy: service, keeping the indentation exactly as shown — two spaces before cron: — then save and exit with Ctrl+O, Enter, Ctrl+X:
  cron:
    image: nextcloud:34-apache
    restart: always
    entrypoint: /cron.sh
    depends_on:
      - db
      - redis
    volumes:
      - nextcloud_data:/var/www/html
Start just that new service — the others keep running untouched:
docker compose up -d cron
 Container nextcloud-cron-1 Starting
 Container nextcloud-cron-1 Started
Tell Nextcloud to expect a real scheduler rather than browser-triggered jobs:
docker compose exec -u www-data app php occ background:cron
Set mode for background jobs to 'cron'
Now confirm the scheduler is genuinely executing jobs rather than just sitting there:
docker compose logs cron
cron-1  | crond: crond (busybox 1.37.0) started, log level 8
cron-1  | crond: USER www-data pid   7 cmd php -f /var/www/html/cron.php
The first line is the scheduler starting; the second is it actually running Nextcloud’s job runner as www-data. That second line is the one that matters, and it appears within five minutes — the interval the schedule uses. In the lab, Nextcloud’s own record of its last background job then advanced from 11:44:55 to 11:51:07 with nobody touching a browser, which is the behaviour you want. From here on docker compose ps shows five rows.
The “untrusted domain” trap
This is the most common way this setup breaks, and it will not happen today — it happens the day you add or change a domain.
Nextcloud only answers to hostnames on its trusted list. Your compose.yaml set that list via NEXTCLOUD_TRUSTED_DOMAINS. Here is the part that catches people: that variable is only read once, when Nextcloud first installs itself. After that it is inert.
The lab tested this directly — changed the variable to add a second domain, recreated the container, and asked Nextcloud what it thought its trusted domains were:
### trusted_domains AFTER changing the env var and recreating:
nextcloud.lab.lineserve.africa
The new domain is simply absent. Nothing errored; the setting was ignored. So when you edit that variable, recreate the container, and still get “You are accessing the server from an untrusted domain”, the file is not the problem — the file is no longer in charge.
The fix is to write the setting directly, with occ. Here is the lab adding a second domain to its own install:
$ docker compose exec -u www-data app php occ config:system:set trusted_domains 1 --value=cloud.example.com
System config value trusted_domains => 1 set to string cloud.example.com

$ docker compose exec -u www-data app php occ config:system:get trusted_domains
nextcloud.lab.lineserve.africa
cloud.example.com
Two entries: the domain it installed with in position 0, the added one in position 1. On your server the command is the same, with the domain you are adding — not the one you installed with, which already holds position 0:
docker compose exec -u www-data app php occ config:system:set trusted_domains 1 --value=drive.example.com
Then list them back with occ config:system:get trusted_domains and you should see your install domain first and drive.example.com second. The next domain you add goes in position 2, and so on.
Keep NEXTCLOUD_TRUSTED_DOMAINS in your compose file anyway — it is what does the right thing on a fresh install, including the restore below.
Where your files actually live
You should know this before you need to know it.
Your files are in a Docker named volume — storage Docker manages, outside the container. Ask where:
docker volume inspect nextcloud_nextcloud_data --format '{{.Mountpoint}}'
/var/lib/docker/volumes/nextcloud_nextcloud_data/_data
They are ordinary files on your server, and you can see them. Replace nimo with the admin username you chose in Step 8 — that folder is named after your account:
sudo ls /var/lib/docker/volumes/nextcloud_nextcloud_data/_data/data/nimo/files/
Documents
Nextcloud Manual.pdf
Nextcloud intro.mp4
Nextcloud.png
Photos
Readme.md
Templates
invoice-notes.txt
There is your uploaded file, sitting on disk.
down is safe. down -v is not.
docker compose down stops and removes the containers. Your volumes — and every file in them — are untouched. The lab ran down, then up -d, and compared the test file’s checksum (a fingerprint that changes if even one byte does) before and after:
6c7249c9577b6acbc89be2de4d18d53159321154f1db3b3d91d78c5b132b4390 /var/www/html/data/nimo/files/invoice-notes.txt
Identical. Containers are disposable; the volumes are the thing that matters.
You can run the same check on your own file — substituting your admin username for nimo:
docker compose exec -u www-data app php occ status
docker compose exec -u www-data app sha256sum /var/www/html/data/nimo/files/invoice-notes.txt
Your hash will not be the string above — it is a fingerprint of your file, so it will be its own unique value. Write down what it says now. The only thing that matters is that it still says the same thing after the restore below.
docker compose down -v is a different command. The -v deletes the volumes:
 Volume nextcloud_db_data Removed
 Volume nextcloud_nextcloud_data Removed
 Volume nextcloud_caddy_data Removed
 Volume nextcloud_caddy_config Removed
That is every file, the entire database, and your certificate — gone, with no confirmation prompt. There is no undo. The next section is how you survive having typed it.
Back it up — and prove the backup works
An untested backup is a rumour. This section takes one, then offers you the drill that proves it.
Taking the backup
Three things need saving: the database, your files, and the config. Still in ~/nextcloud:
mkdir -p ~/nextcloud-backups
Put Nextcloud into maintenance mode so nothing is written mid-copy:
docker compose exec -u www-data app php occ maintenance:mode --on
Dump the database:
docker compose exec -T db sh -c 'exec mariadb-dump --single-transaction -u root -p"$MARIADB_ROOT_PASSWORD" nextcloud' > ~/nextcloud-backups/nextcloud-db.sql
Archive the files and config, using a throwaway container that can see the volume:
docker run --rm -v nextcloud_nextcloud_data:/src:ro -v ~/nextcloud-backups:/dst alpine \
  tar czf /dst/nextcloud-data.tar.gz -C /src .
Both of those are silent when they work — the first time, the docker run also prints a few lines while it downloads the small alpine image. Turn maintenance mode back off:
docker compose exec -u www-data app php occ maintenance:mode --off
Maintenance mode disabled
Check you have two real files:
ls -lh ~/nextcloud-backups/
total 320M
-rw-r--r-- 1 root   root   319M Jul 17 11:38 nextcloud-data.tar.gz
-rw-rw-r-- 1 ubuntu ubuntu 536K Jul 17 11:37 nextcloud-db.sql
A nextcloud-db.sql of only a few hundred bytes means the dump failed and you saved an error message instead — open it and look. A healthy dump is hundreds of kilobytes even on a nearly empty instance.
These backups are on the same server, so they do not protect you from losing that server. Copy them somewhere else — that is the whole point. Lineserve Object Storage starts at $0.035/GB/month with transfer in and out free, so pushing a nightly archive off the box costs cents and no bandwidth charges.
The restore drill
The lab tested this the only way that counts: ran docker compose down -v to destroy everything, then restored from those two files.
You can rehearse it too, and you should — but understand what you are agreeing to. The first command really does delete all your files and your database, and your backup is the only way back. That is the point of the exercise, and the best day to find out your backup is bad is a day you chose. If you would rather not, read the steps and keep them for the day you need them.
From ~/nextcloud:
docker compose down -v
Recreate the empty volumes and network without starting anything:
docker compose create
Unpack the files back into the volume:
docker run --rm -v nextcloud_nextcloud_data:/dst -v ~/nextcloud-backups:/src:ro alpine \
  tar xzf /src/nextcloud-data.tar.gz -C /dst
Start only the database, and let it finish initialising before importing anything:
docker compose up -d db
Container nextcloud-db-1 Started
docker compose exec -T db sh -c 'mariadb-admin ping -u root -p"$MARIADB_ROOT_PASSWORD" --silent' && echo "db ready"
mysqld is alive
db ready
If that reports a connection error instead, the database is still starting — wait ten seconds and run it again. Once it is ready, import the dump and bring everything up:
docker compose exec -T db sh -c 'exec mariadb -u root -p"$MARIADB_ROOT_PASSWORD" nextcloud' < ~/nextcloud-backups/nextcloud-db.sql
docker compose up -d
The restore trap nobody mentions
Load the site now and you get 503 Service Unavailable. This is real captured output from the lab’s restore, and the reason is neat:
<?xml version="1.0" encoding="utf-8"?>
<d:error xmlns:d="DAV:" xmlns:s="http://sabredav.org/ns">
  <s:exception>OCA\DAV\Exception\ServerMaintenanceMode</s:exception>
  <s:message>System is in maintenance mode.</s:message>
</d:error>
You took the backup while maintenance mode was on, so the config file inside your archive says maintenance mode is on. You restored it faithfully. Turn it off:
docker compose exec -u www-data app php occ maintenance:mode --off
Now check the restore actually worked. Same two commands as before, with your own admin username in place of nimo:
docker compose exec -u www-data app php occ status
docker compose exec -u www-data app sha256sum /var/www/html/data/nimo/files/invoice-notes.txt
Here is the lab’s:
  - installed: true
  - version: 34.0.1.2
6c7249c9577b6acbc89be2de4d18d53159321154f1db3b3d91d78c5b132b4390  /var/www/html/data/nimo/files/invoice-notes.txt
Compare yours against the hash you wrote down earlier, not against this one. If it matches, the file came back byte for byte — which is the whole point of the drill. For the lab it was the same checksum as before the volumes were destroyed: the identical file. The original login worked, and the settings came back with it. That is a restore you can trust, because it was performed rather than described.
One side effect worth expecting: down -v also deleted Caddy’s certificate store, so Caddy requests a fresh certificate on restore. That is automatic, but Let’s Encrypt enforces rate limits per domain — so do not practise this drill a dozen times in an afternoon on your real domain.
Does it survive a reboot?
Servers reboot, whether you planned it or not. The restart: always line on every service is what brings the stack back, and the lab tested it by rebooting the machine:
sudo reboot
That drops your SSH connection. Wait a minute, then log back in and return to the project directory:
ssh [email protected]
cd ~/nextcloud
uptime -p
docker compose ps --format '{{.Name}}\t{{.Status}}'
up 1 minute
nextcloud-app-1 Up About a minute
nextcloud-caddy-1   Up About a minute
nextcloud-db-1  Up About a minute
nextcloud-redis-1   Up About a minute
up 1 minute confirms the machine genuinely restarted, and every container came back with no intervention. The test file was intact — same checksum again — and the site answered over HTTPS immediately. You do not need to run docker compose up after a reboot.
That check ran against the four core services. The cron container from Step 11 carries the same restart: always and comes back the same way, so your own listing will show it as a fifth row.
Firewall: what is actually protecting you
If you set up UFW, as How to Set Up a Firewall with UFW on Ubuntu 24.04 describes, you need to know something specific about how it interacts with Docker.
The lab enabled UFW, set it to deny all incoming traffic, and allowed only SSH on port 22 — no rule permitting 80 or 443:
Status: active

To                         Action      From
--                         ------      ----
22/tcp                     ALLOW       Anywhere
22/tcp (v6)                ALLOW       Anywhere (v6)
Then requested the site from a machine out on the public internet:
https from the public internet: HTTP 302
Still served. Docker publishes ports by writing its own firewall rules that are evaluated before UFW’s, so a container’s published port stays open regardless of what ufw status claims. This is not a bug and it will not be fixed; it is how Docker’s networking works.
For this stack that is harmless — you want 80 and 443 open. But absorb the implication: if you ever add ports: - "3306:3306" to the db service to debug something, your database is exposed to the entire internet and UFW will not stop it, no matter what its status says. That is why the compose file above publishes nothing except Caddy. The container network is the boundary, not UFW.
For a firewall you can actually rely on in front of Docker, use one that sits outside the host — your provider’s network firewall — rather than one running on it.
Upgrading later
Because the images are pinned, upgrading is a decision, not an accident. When Nextcloud 35 is out and you want it:
- Take a backup first, and be able to restore it. You have just practised this.
- Run
nano compose.yamland change both Nextcloud images —appandcron— to the next major version. Never skip a major version; go 34 → 35, then 35 → 36. Skipping is what bricks instances. - Pull the new images and recreate the containers:
docker compose pull
docker compose up -d
- Confirm it came back:
docker compose exec -u www-data app php occ status
The database upgrade runs automatically on start, and installed: true with maintenance: false means it worked. If occ status reports needsDbUpgrade: true, run docker compose exec -u www-data app php occ upgrade.
What this honestly costs
Now the arithmetic promised at the top.
Fetched from Google’s and Dropbox’s own pricing pages on 2026-07-17 — note both served a euro storefront, so what you are shown in your country will differ, and these figures are reproduced as read rather than converted:
| Plan | Storage | Price |
|---|---|---|
| Google One Basic | 100 GB | €1.99/month |
| Google One (AI Plus tier) | 2 TB | €9.99/month |
| Dropbox Basic | 2 GB | Free |
| Dropbox Plus | 2 TB | €9.99/month |
Against a Lineserve Linux VPS, which is the whole server and not a storage plan:
| Plan | Specs | Monthly |
|---|---|---|
| S1 | 1 vCPU; 2 GB RAM; 20 GB SSD; 1 TB transfer | $13.51 · KES 1,746 · TZS 33,775 · NGN 21,616 |
| M1 | 2 vCPU; 4 GB RAM; 80 GB SSD; 3 TB transfer | $34.18 · KES 4,418 · TZS 85,450 · NGN 54,688 |
Read that honestly: for 100 GB of storage, Google One is far cheaper than any VPS, and it always will be. Nobody should self-host to save money on 100 GB. Anyone telling you otherwise is selling something.
The picture changes on different axes:
- Per-user cost. Nextcloud does not charge per person. The VPS costs the same with one account or fifteen, and unlimited accounts is the thing hosted storage charges hardest for.
- Where the data sits. Lineserve runs regions in Nairobi (
ke-1a), Dar es Salaam (tz-1a) and Lagos (ng-1a), which means data residency for Kenya’s Data Protection Act, Tanzania’s Personal Data Protection Act, or Nigeria’s NDPA — your files stay in-country. That is a requirement no consumer storage plan will meet for you. - Paying for it. Billing in KES, TZS and NGN, with M-Pesa and mobile money in Kenya and Tanzania, and card or bank transfer in Naira for Nigeria. No foreign card, no forex.
- What you are actually paying for. Not gigabytes — a whole server, which can also run the other things in How to Self-Host Uptime Kuma for Free Server Monitoring with Docker alongside this one.
And the cost that is not on either table: your time. Backups, updates, and the occasional evening when something breaks. If you would rather buy that back, Google Workspace Pricing 2026 | Plans, Features & Costs lays out the hosted side. There is no shame in that answer.
On sizing: the S1’s 20 GB disk gives you roughly 15 GB of usable Drive once the Docker images are accounted for, which is fine for documents and thin for photos. The M1’s 80 GB is the more honest starting point for a Drive replacement.
Ready to run your own
The lab build above — Nextcloud, MariaDB, Redis and Caddy, with real HTTPS and background jobs — ran comfortably on 2 GB of RAM. That is a Lineserve Linux VPS S1 at KES 1,746 · TZS 33,775 · NGN 21,616 · $13.51/month if your files are documents, or M1 at KES 4,418 · TZS 85,450 · NGN 54,688 · $34.18/month if you are moving photos and want room to grow. Both land in Nairobi, Dar es Salaam or Lagos, and both bill in your own currency.
Launch a Linux VPS and follow this guide start to finish → Never used one before? Getting Started with Lineserve Cloud: Launch Your First VPS walks through the first boot, then come back to Step 1 here.
Troubleshooting
502 Bad Gateway right after starting. Nextcloud is still unpacking. Wait, and watch docker compose logs -f app. If it persists for more than a few minutes, the app container is failing — check docker compose ps for a Restarting status.
Certificate errors, or Caddy loops retrying. DNS. Confirm dig +short nextcloud.example.com returns your server’s IP and any proxy toggle at your DNS provider is off. Then docker compose logs caddy.
“You are accessing the server from an untrusted domain.” See the trusted-domain section — editing the environment variable will not fix it after install. Use occ config:system:set.
503 with “System is in maintenance mode” after a restore. Expected. Run docker compose exec -u www-data app php occ maintenance:mode --off.
permission denied ... /var/run/docker.sock. You are not in the docker group yet, or you have not logged out and back in since being added.
no configuration file provided: not found. You are not in ~/nextcloud. Run cd ~/nextcloud and try again.
Uploads fail on large files. The Nextcloud image ships a default upload limit smaller than a video. Raising it means setting PHP limits in the app container. The lab did not test a large-file upload or the corresponding PHP setting on this stack, and this guide will not print a value it has not run.
Everything is gone after docker compose down -v. Restore from the backup, as above. If you have no backup, the files are not recoverable — that command deletes the volumes.