How to Install Postiz on Your Own VPS with Docker Compose
Install Postiz on your own Ubuntu VPS with Docker Compose — the full Temporal-based stack, correctly sized, behind HTTPS.
By the end of this guide you will have Postiz — an open-source (AGPL-3.0) scheduler that posts to social networks on a calendar you control — running on your own Ubuntu server, reachable at your own domain over HTTPS, with an account you can log into.
The single mistake that turns this install into an afternoon of confusion: Postiz is not the three small containers most write-ups still show. Its official Compose file now brings up a full Temporal job-orchestration stack alongside the app — Temporal itself, an Elasticsearch node, and a second PostgreSQL database — on top of Postiz’s own PostgreSQL and Redis. That is eight containers, and Elasticsearch alone wants more memory than the whole thing used to. The official install page still says it was tested on 2 GB of RAM; that figure is from before Temporal landed. Size for the stack that actually ships today, and the rest is straightforward.
Here is the whole job:
- Pick a server big enough for the real stack (numbers below).
- Point a domain at it.
- Install Docker and the Compose plugin.
- Fetch Postiz’s official Compose file and set a handful of required values.
- Bring the stack up and watch it become healthy.
- Put Nginx and a Let’s Encrypt certificate in front so it answers on HTTPS.
- Create your account, then wire up the social networks you post to.
The version strings and terminal output below are real, captured from this exact sequence on Ubuntu 24.04 — yours will read the same. Throughout, postiz.example.com stands in for your server’s hostname; substitute your own domain wherever it appears.
What size server this actually needs
Postiz’s own components are light. Elasticsearch is not, and the Temporal stack pulls it in whether or not you ever look at a Temporal dashboard. On a 2 vCPU / 8 GB server, the eight containers at rest settled at:
               total        used        free      shared  buff/cache   available
Mem:           7.6Gi       2.3Gi       187Mi        41Mi       5.5Gi       5.3Gi
Swap:             0B          0B          0B
Broken down per container, docker stats shows where it goes — the app and Elasticsearch first, everything else a rounding error:
NAME                     MEM USAGE / LIMIT     CPU %
postiz                   927.5MiB / 7.635GiB   0.34%
temporal-elasticsearch   544.4MiB / 7.635GiB   0.52%
temporal                 143.8MiB / 7.635GiB   1.69%
temporal-postgresql      112.4MiB / 7.635GiB   0.43%
postiz-postgres          40.76MiB / 7.635GiB   0.00%
temporal-ui              22.02MiB / 7.635GiB   0.00%
postiz-redis             6.762MiB / 7.635GiB   0.16%
temporal-admin-tools     520KiB  / 7.635GiB    0.00%
That is about 2.3 GB in use with the stack idle and one account logged in — roughly 1.8 GB of it in the containers, the rest the operating system. The Postiz app and Elasticsearch account for most of it, and both climb under real work: indexing, media processing and scheduled jobs firing all cost memory this resting figure never shows. So treat the docs’ 2 GB as a non-starter for the current stack, 4 GB as the realistic floor with little room to spare, and 6–8 GB as the size that leaves you room to actually use it — the size these figures were taken on. There is no cutting Elasticsearch out to shrink it: the Temporal stack depends on it, and Postiz depends on Temporal.
Disk is the other quiet requirement. The image set alone is substantial — the Postiz app image is over 5 GB on its own:
REPOSITORY:TAG                                        SIZE
ghcr.io/gitroomhq/postiz-app:latest                   5.66GB
elasticsearch:7.17.27                                 1.01GB
temporalio/admin-tools:1.28.1-tctl-1.18.4-cli-1.4.1   749MB
temporalio/auto-setup:1.28.1                          745MB
postgres:16                                           642MB
postgres:17-alpine                                    424MB
redis:7.2                                             169MB
temporalio/ui:2.34.0                                  163MB
A fresh 8 GB root volume runs out part-way through the first docker compose up, with a no space left on device error mid-download. Give the server at least 25–30 GB of disk so the images, volumes and your uploads have room.
Getting Started with Lineserve Cloud: Launch Your First VPS walks through ordering a server if you do not have one yet; come back once it is running and you can SSH in.
Before you start
You need four things in place:
- A VPS running Ubuntu 24.04, sized per the section above, with its public IP address to hand. A clean install is assumed — nothing else is using ports 80, 443 or 4007.
- A user on that server who can run
sudo, over SSH. Everything below is typed as that user, never asroot. Initial Ubuntu 24.04 Server Setup: Users, SSH, Firewall covers creating one and getting SSH keys working if you are starting from a bare box. - A domain name you control, with access to its DNS. You need it before step 4 — the address Postiz is served at becomes part of its configuration, so it has to be settled before the first launch, not bolted on after.
- Familiarity with a terminal and SSH. This is an intermediate guide: it does not re-explain
cd,sudoor how to edit a file, but it does show exactly what goes where.
What the examples stand for
Swap in your own values as you go:
| What it is | The value used below | Where yours comes from |
|---|---|---|
| Your domain for Postiz | postiz.example.com |
A subdomain of a domain you own |
| Your server’s IP address | 203.0.113.10 |
Your VPS provider’s control panel |
| The user you log in as | ubuntu |
Whatever you named it during server setup |
JWT_SECRET |
a 64-character random string | You generate it in step 4 |
| Database password | a random string | You generate it in step 4 |
Step 1: Log in and confirm the server
From your own machine, substituting your user and IP:
ssh [email protected]
Confirm what you are on before installing anything onto it:
lsb_release -a
The Description line is the one to check:
Distributor ID: Ubuntu
Description:    Ubuntu 24.04.4 LTS
Release:    24.04
Codename:   noble
(If lsb_release is missing on a minimal image, cat /etc/os-release shows the same version.) If that says anything older than 24.04, rebuild the server on a current release rather than working around it; the Docker repository and package names below are written for 24.04.
Step 2: Point your domain at the server
Postiz bakes its public URL into the frontend at startup, so the domain has to exist and resolve before you configure the app. Do it now, while DNS has time to propagate.
At whatever manages your domain’s DNS, add an A record:
- Type:
A - Name:
postiz(forpostiz.example.com); some panels want the full subdomain, some just the label - Value / Points to: your server’s IP address
- TTL: leave the panel default
If you use Cloudflare, set the record to DNS only (grey cloud), not proxied, at least until the certificate in step 6 is issued — the Let’s Encrypt check needs to reach your server directly.
Give it a minute, then from the server confirm the name resolves to it:
getent hosts postiz.example.com
It should print your server’s IP address followed by the name. If it prints nothing, DNS has not propagated yet — wait and try again before going on. (getent is always present on Ubuntu; dig lives in the dnsutils package, which a clean server does not have.)
Step 3: Install Docker and the Compose plugin
Install Docker Engine from Docker’s own apt repository rather than Ubuntu’s docker.io package — you want the current engine and the Compose plugin, which is what docker compose (a subcommand, not the old standalone docker-compose script) refers to.
Set up the repository:
sudo apt-get update
sudo apt-get install -y ca-certificates curl
sudo install -m 0755 -d /etc/apt/keyrings
sudo curl -fsSL https://download.docker.com/linux/ubuntu/gpg -o /etc/apt/keyrings/docker.asc
sudo chmod a+r /etc/apt/keyrings/docker.asc
echo "deb [arch=$(dpkg --print-architecture) signed-by=/etc/apt/keyrings/docker.asc] https://download.docker.com/linux/ubuntu $(. /etc/os-release && echo "$VERSION_CODENAME") stable" | sudo tee /etc/apt/sources.list.d/docker.list > /dev/null
Then install the engine, CLI and plugins:
sudo apt-get update
sudo apt-get install -y docker-ce docker-ce-cli containerd.io docker-buildx-plugin docker-compose-plugin
Check what you got:
docker --version
docker compose version
Two version strings, and the second confirms the Compose plugin is present:
Docker version 29.6.2, build dfc4efb
Docker Compose version v5.3.1
By default Docker needs sudo. Add yourself to the docker group so the rest of the commands read cleanly:
sudo usermod -aG docker $USER
That change takes effect at your next login, so log out and back in now (close the SSH session and reconnect). Confirm it took:
groups
The list that comes back ends in docker:
ubuntu adm cdrom sudo dip lxd docker
That last word is the one that matters. With it there, docker ps runs without sudo and without a permission error — an empty table for now, since nothing is running yet.
Step 4: Get the Compose file and configure it
A minimal Ubuntu image may not ship Git or the nano editor, so install them first:
sudo apt-get install -y git nano
Now clone Postiz’s official Compose repository. Pulling it from source rather than pasting a copy means you get the current image tags and the Temporal wiring exactly as upstream maintains them:
cd ~
git clone https://github.com/gitroomhq/postiz-docker-compose
cd postiz-docker-compose
ls
The clone leaves you with a small set of files:
LICENSE README.md docker-compose.dev.yaml docker-compose.yaml dynamicconfig
The file that matters is docker-compose.yaml (the .dev variant is for Postiz’s own developers — ignore it). Most of it — the Temporal services, Elasticsearch, the two databases — you leave completely alone. All you touch is the block at the top of the postiz service marked # === Required Settings, plus the matching database password further down.
First generate two secrets. JWT_SECRET signs login sessions and the database password protects Postgres; both must be long and random, and neither is anything you type by hand:
openssl rand -hex 32    # use this for JWT_SECRET
openssl rand -hex 16    # use this for the database password
Each prints one long hex string:
078029aa210092d221b92a8805ab2deba94d39eb349af8cf2be6dabb9af81771
52192d7d32c247dc096a61c6d0366db4
Copy those two values somewhere for a moment — you are about to paste them into the file. Generate your own; the ones above are throwaway examples.
Now edit the file:
nano docker-compose.yaml
In the # === Required Settings block, change these five lines. Everything on the right is what you set; postiz.example.com becomes your domain and the two secrets are the ones you just generated:
      MAIN_URL: 'https://postiz.example.com'
      FRONTEND_URL: 'https://postiz.example.com'
      NEXT_PUBLIC_BACKEND_URL: 'https://postiz.example.com/api'
      JWT_SECRET: '<the openssl rand -hex 32 output>'
      DATABASE_URL: 'postgresql://postiz-user:<the openssl rand -hex 16 output>@postiz-postgres:5432/postiz-db-local'
Then find the postiz-postgres service lower in the same file and set its POSTGRES_PASSWORD to the same database password you just put in DATABASE_URL:
POSTGRES_PASSWORD: <the openssl rand -hex 16 output>
Those two passwords must match exactly — DATABASE_URL is how Postiz connects, POSTGRES_PASSWORD is what the database is created with. A mismatch is the most common reason the stack comes up but Postiz cannot start.
What each required value is for, so you are not editing blind (Postiz’s configuration reference documents the full list):
| Setting | What it does |
|---|---|
MAIN_URL / FRONTEND_URL |
The public address the browser loads Postiz at |
NEXT_PUBLIC_BACKEND_URL |
Where the browser calls the API — the same host with /api |
JWT_SECRET |
Signs login session tokens |
DATABASE_URL |
How Postiz reaches its PostgreSQL database |
BACKEND_INTERNAL_URL |
How the frontend reaches the backend inside the container — leave it as http://localhost:3000 |
REDIS_URL |
How Postiz reaches Redis — leave it as the default; it points at the bundled container |
Leave IS_GENERAL: 'true' as it is — that is the flag that puts Postiz in self-hosted mode. The long list of X_API_KEY, LINKEDIN_CLIENT_ID and similar entries below stay blank for now; step 7 explains what they are and when you fill them.
Save and exit.
Step 5: Bring the stack up
Start everything in the background:
docker compose up -d
Docker pulls eight images the first time — close to ten gigabytes in all, per the sizes above — so this takes a while on a fresh box. The postiz-app image in particular is large and slow to extract. When it returns, watch the containers come up in dependency order: the databases and Elasticsearch first, then Temporal, and only once Temporal is healthy does Postiz itself start. That ordering is deliberate and enforced in the Compose file, so the first minute or two where postiz is still starting is normal.
Check status until everything reads healthy:
docker compose ps
Give it a few minutes; you are waiting for all eight to report healthy:
NAME                     STATUS
postiz                   Up 3 minutes (healthy)
postiz-postgres          Up 3 minutes (healthy)
postiz-redis             Up 3 minutes (healthy)
temporal                 Up 3 minutes (healthy)
temporal-admin-tools     Up 3 minutes
temporal-elasticsearch   Up 3 minutes (healthy)
temporal-postgresql      Up 3 minutes (healthy)
temporal-ui              Up 3 minutes (healthy)
All eight containers, and every one that has a health check reporting healthy (temporal-admin-tools is a one-shot helper with no check, so a bare Up is correct for it). postiz carries a start_period of two minutes before its health check counts, so give it that long. If it is still starting after five minutes, look at its logs:
docker compose logs postiz --tail 50
Confirm the app is answering on its own port before you put a proxy in front of it. The Compose file maps Postiz to port 4007 on the server:
curl -sI http://localhost:4007/ | head -1
The response line comes back as a redirect:
HTTP/1.1 307 Temporary Redirect
That redirect is Postiz sending you to its /auth login page — which means the app is up and answering. It is only listening on the server itself so far; the next step makes it reachable from the internet, safely.
Step 6: Put HTTPS in front
Postiz is running on port 4007 with no encryption. Nginx sits in front of it as a reverse proxy, terminates HTTPS with a free Let’s Encrypt certificate, and forwards requests to Postiz. This is also what makes the app usable at all for real work — the social networks you connect in step 7 will only redirect back to an https:// address.
Install Nginx and Certbot:
sudo apt-get install -y nginx certbot python3-certbot-nginx
Create a server block for your domain that proxies everything to Postiz on 4007:
sudo nano /etc/nginx/sites-available/postiz
server {
    listen 80;
    listen [::]:80;
    server_name postiz.example.com;

    client_max_body_size 100M;

    location / {
        proxy_pass http://127.0.0.1:4007;
        proxy_http_version 1.1;
        proxy_set_header Host              $host;
        proxy_set_header X-Real-IP         $remote_addr;
        proxy_set_header X-Forwarded-For   $proxy_add_x_forwarded_for;
        proxy_set_header X-Forwarded-Proto $scheme;
        proxy_set_header Upgrade           $http_upgrade;
        proxy_set_header Connection        "upgrade";
    }
}
client_max_body_size 100M lets you upload video and images through the proxy; without it Nginx caps bodies at 1 MB and large uploads fail. The Upgrade/Connection pair keeps Postiz’s live updates working through the proxy.
Enable the site, drop Nginx’s default page, test the config and reload:
sudo ln -s /etc/nginx/sites-available/postiz /etc/nginx/sites-enabled/postiz
sudo rm -f /etc/nginx/sites-enabled/default
sudo nginx -t
sudo systemctl reload nginx
nginx -t must pass before the reload does anything:
nginx: the configuration file /etc/nginx/nginx.conf syntax is ok
nginx: configuration file /etc/nginx/nginx.conf test is successful
Now get the certificate. Certbot reads the server_name from the block you just wrote, proves you control the domain over port 80, installs the certificate and rewrites the block to serve HTTPS and redirect plain HTTP to it:
sudo certbot --nginx -d postiz.example.com
Certbot asks for an email (for expiry warnings) and the terms of service the first time. Then:
Requesting a certificate for postiz.example.com

Successfully received certificate.
Certificate is saved at: /etc/letsencrypt/live/postiz.example.com/fullchain.pem
Key is saved at:         /etc/letsencrypt/live/postiz.example.com/privkey.pem
This certificate expires on 2026-10-19.
These files will be updated when the certificate renews.
Certbot has set up a scheduled task to automatically renew this certificate in the background.

Deploying certificate
Successfully deployed certificate for postiz.example.com to /etc/nginx/sites-enabled/postiz
Congratulations! You have successfully enabled HTTPS on https://postiz.example.com
That last line — Congratulations! You have successfully enabled HTTPS — is the one to look for. Certbot has also rewritten your Nginx block to serve HTTPS and redirect plain HTTP to it, and installed a systemd timer that renews the certificate before it expires, so there is nothing to schedule yourself.
Confirm both halves from your own machine or a browser: plain HTTP now redirects, and HTTPS serves Postiz:
curl -sI http://postiz.example.com/ | head -1
curl -sI https://postiz.example.com/ | head -1
The two status lines tell the whole story:
HTTP/1.1 301 Moved Permanently
HTTP/1.1 307 Temporary Redirect
Plain HTTP now redirects to HTTPS (301), and HTTPS reaches Postiz, which sends you on to its login page (307). Both are exactly right.
Step 7: Create your account and connect a channel
Open your domain in a browser:
https://postiz.example.com
Postiz has no users yet, so it shows a sign-up screen. The first account you create is the administrator.
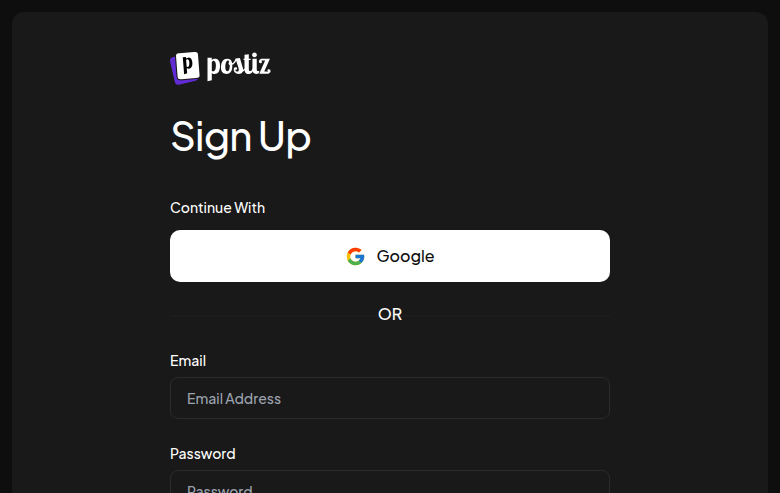
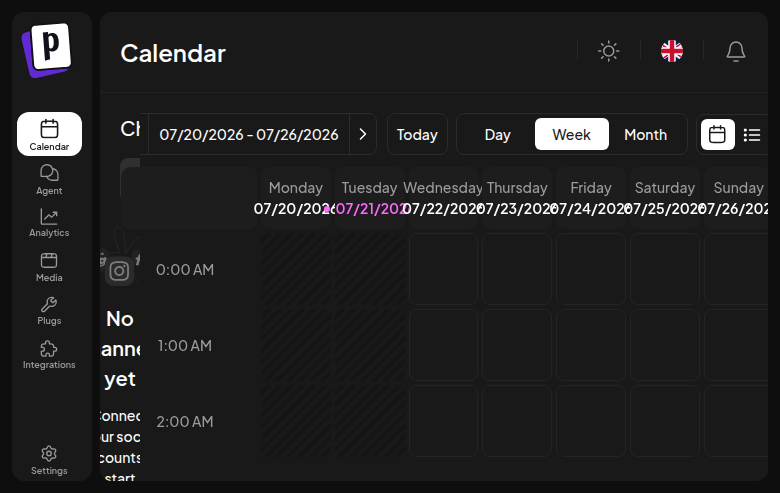
Enter an email, a strong password and a company name, and create the account. Postiz then opens a short onboarding: first a Connect Your Channels screen (the same channel grid shown further down) with a Continue without channels button, then a tutorial screen with a Get Started button. Click through both — channels can wait. Behind it is the Postiz calendar, empty because nothing is scheduled and no channels are connected yet.
Once you have your account, close registration so nobody else can create one on your server. DISABLE_REGISTRATION sits in the same # === Required Settings block you edited in step 4; open the file and flip it to true:
nano docker-compose.yaml
DISABLE_REGISTRATION: 'true'
Then recreate the Postiz container so the change takes effect — docker compose up -d restarts only what changed:
docker compose up -d
Connecting a social network — what it actually takes
Postiz can post to more than thirty networks — X, LinkedIn, Facebook, Instagram, Threads, Mastodon, Bluesky, YouTube, TikTok, Pinterest, Reddit, Discord, Telegram, and a long tail of others down to Medium, Dev.to and WordPress — and the channel picker shows them all:

But on a self-hosted install, Postiz does not come with the keys to those networks — you bring your own. For most of them you register a developer application on the platform itself, which gives you a client ID and secret, and you paste those into the matching variables in docker-compose.yaml (X_API_KEY and X_API_SECRET for X, LINKEDIN_CLIENT_ID and LINKEDIN_CLIENT_SECRET for LinkedIn, and so on down the list you saw in the file). Restart the stack, and that network’s button becomes active; click it and you are sent to the platform to authorise your own app, which redirects back to https://postiz.example.com — the reason HTTPS and the correct domain had to be in place first.
The effort is per-network and it is front-loaded onto the platforms, not Postiz. Several — X, Facebook/Instagram, TikTok — make you create a developer account and, for some actions, submit the app for review before posting works. A few are lighter: Mastodon needs only your instance URL, Telegram a bot token, Bluesky an app password. Postiz’s documentation covers the setup network by network; budget an evening for the first one and minutes for each after. There is no shortcut a self-hosted install can offer here — the credentials are yours to create because the connection is between your server and your own account on each platform.
Keeping it running
Updates. The Compose file pins the app to the latest tag, so an update is a pull and a recreate:
cd ~/postiz-docker-compose
docker compose pull
docker compose up -d
Because latest moves, note the version you are on now — Postiz prints it at the bottom of the channels panel (it read v2.21.10 on this install) — so you know what changed if an update misbehaves. If a major upgrade ever needs migration steps, Postiz documents them on its migration page; that is the same page existing users followed when the Temporal stack was introduced.
Backups. Your data lives in two Docker volumes: postiz-docker-compose_postgres-volume (the database — accounts, scheduled posts, connected-channel tokens) and postiz-docker-compose_postiz-uploads (media you have uploaded). Those two are what to back up; the Temporal and Elasticsearch volumes are rebuildable state, not your data.
It survives a reboot. Every service in the Compose file is set to restart: always, so the stack comes back on its own after the server restarts. That is the configuration, though — worth proving once while nothing depends on it:
sudo reboot
Reconnect after a minute. The Compose file lives in that directory, so change into it first — otherwise docker compose has nothing to read:
cd ~/postiz-docker-compose
docker compose ps
curl -sI https://postiz.example.com/ | head -1
A couple of minutes of uptime, all eight containers healthy again, and the site still answering — without you touching anything:
NAME                     STATUS
postiz                   Up 2 minutes (healthy)
postiz-postgres          Up 2 minutes (healthy)
postiz-redis             Up 2 minutes (healthy)
temporal                 Up 2 minutes (healthy)
temporal-admin-tools     Up 2 minutes
temporal-elasticsearch   Up 2 minutes (healthy)
temporal-postgresql      Up 2 minutes (healthy)
temporal-ui              Up 2 minutes (healthy)
HTTP/1.1 307 Temporary Redirect
Where this leaves you
You have Postiz running on infrastructure you control, behind your own certificate, with your data in volumes you can back up — and no per-seat fee or posting cap between you and your own social accounts. What it costs you instead is the box it runs on and the half-hour per network to wire up the API keys.
That box is the one decision worth getting right. The measured footprint points at 2 vCPU, 6–8 GB of RAM and around 30 GB of SSD — enough that Elasticsearch and the app are not fighting the operating system for memory. Lineserve Cloud Servers let you build a server to exactly that shape — set the vCPU, RAM and SSD to those numbers rather than paying for a fixed tier that rounds up or leaves you short — and bill in shillings by M-Pesa, bank transfer or card with no currency conversion. If you would rather pick a ready-made plan, the Linux VPS presets sit nearby, though the 4 GB tier is the floor rather than the comfortable choice here. Either way you get a dedicated IPv4 address, which is what the A record in step 2 needs.
If the stack ever runs short of memory during an update or a burst of scheduled posts, Swap Space on a VPS: When You Need It and How to Add It explains when adding swap genuinely helps and when it is only papering over a box that is too small — and with Elasticsearch in the mix here, it is usually the latter.